foreground color #ffd8e6 and background color #cb7398
1 Open new image 600x600.
2. Fill this with the foreground color.
3. New raster layer - Fill this with the background color.
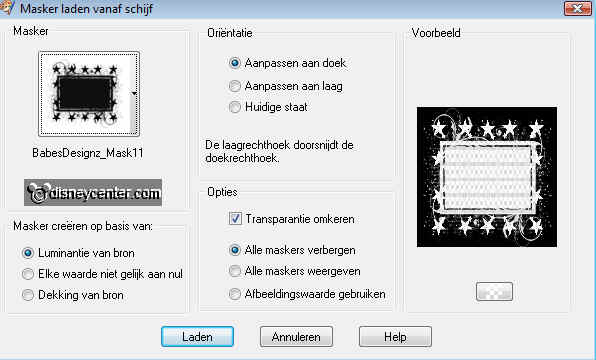
4. Layers - Load/Save Mask - Load Mask from disk.
5. Look for Babes Designs Mask11 with this setting.
6. Layers - merge - merge group.
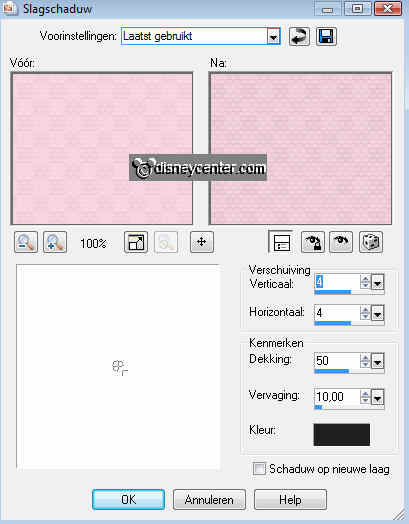
7. Effects - 3D Effects - drop shadow,
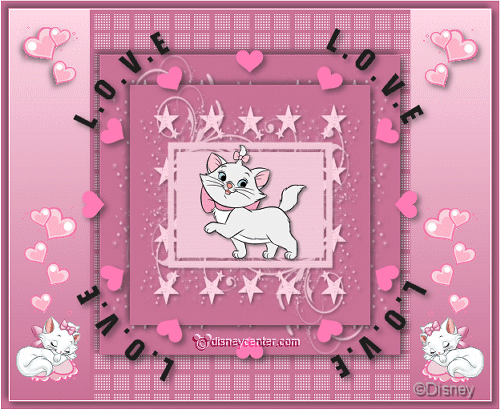
8. Copy the tube Aristocats27 and paste as a new layer.
9. Give the same drop shadow as in point 7.
10. Layers - merge - merge all.
11. Image - Resize 50%
12. Open new image 600x600
13. Fill this with the background color.
14. Copy the little image and paste as a new layer.
15. Give the same drop shadow as in point 7.
16. Do it again, but now vert. and horz. at -4
17. Duplicate this layer.
18. Stay at raster 2 - Image - Resize 125%. - All layers not checked.
19. Go to Crop Tool and crop this with 60 pix. at top and bottom.

20. Copy the HEARTS and paste as a new layer.
21. Give the same drop shadow as in point 7.
22. Copy the WORTART and paste as a new layer.
23. Give the same drop shadow as in point 7.
24. Stay at the bottom layer.
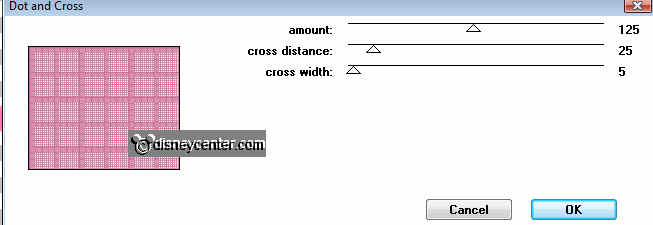
25. Effects - Penta.com - Dot and Cross with this setting.
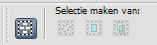
26. Go to selection tool - selection - custom selection - With this setting.
27. Selections - Invert.
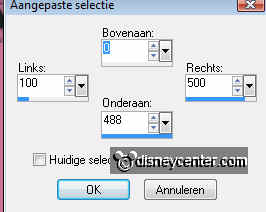
28. New raster layer - fill this with gradient radial.
29. This layer comes above raster 1.
30. Selections - select none.
31. Copy the tube littlehearts and paste as a new layer.
32. Place this right at the top.
33. Give the same drop shadow as in point 7.
34. Duplicate this layer. - Image - mirror.
35. Image - add border 1 color white
36. Image -add border 10 background color.
37. Image - add border 1 color white
38. Selections - select all - modify - contract 10.
39. Let selection stay.
40. Give the same drop shadow as in point 7.
41. Do it again, but now vert. and horz. at -4
42. Selections - select none.
42a. Put your watermark into the image.
43. Open Animation Shop - Open Animation - look for animation
disneyMarie3.
44. Edit - select all.
45. Back in PSP - copy
46. Back in animation shop - paste as a new animation.
47. Duplicate this animation (2 frames now) - Edit - select all.
48. Copy disneyMarie3 - paste into selected frame - left at the bottom.
49. Go back to disneyMarie3 - Animation - mirror.
50. Copy and paste into selected frame - place this right at the bottom.
51. Animation - Resize format animation - width 500.
52. File - save as - give name - click 3 times at next and than at finish.