1.
File - open new transparent image 800x600.
Set in the material palette the foreground color at #e8acae
and the background color at #bf080a.
Make from the foreground a
gradient rectangular - with this setting.

2.
Activate flood fill tool - fill the layer with
the gradient.
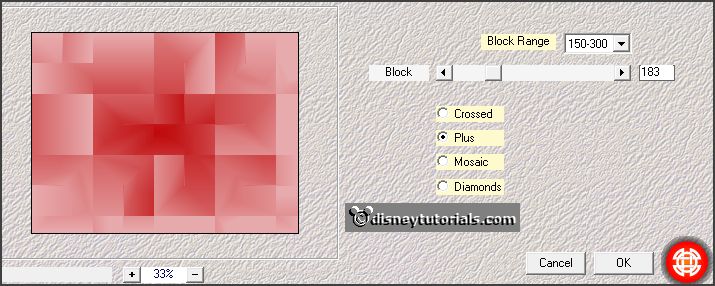
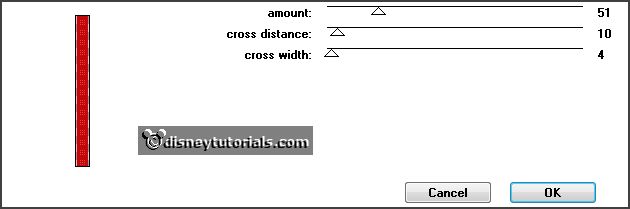
Effects - plug-ins - Mehdi - Sorting Tiles - with this setting - click
OK.
Effects - Image effects - seamless tiling - default setting.
Effects - Edge effects - enhance.
3.
Layers - new raster layer.
Fill the layer with the gradient.
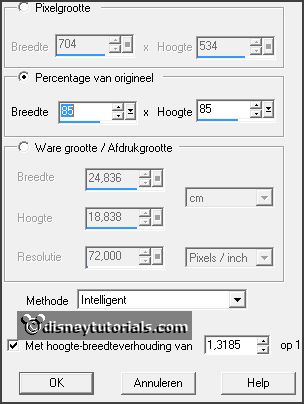
Image - resize 85% - all layers not checked.
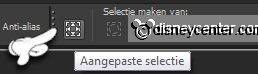
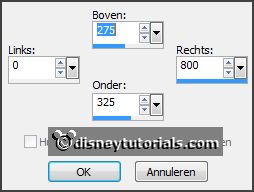
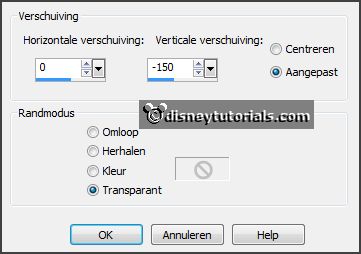
Activate selection tool - custom selection -
with this setting.
4.
Layers - new raster layer.
Fill the layer with the background color.
Effects - plug-ins -
Penta.com - Dot and Color -
with this setting -
click OK.
Effects - plug-ins - FM Tile Tools - Blend Emboss -
default setting
- click Apply.
Selections - select none.
Layers - arrange - move down.
5.
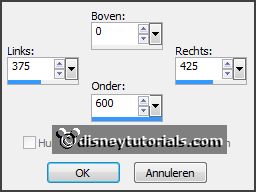
Activate selection tool - custom selection
-
with this setting.
Layers - new raster layer.
Fill the layer with the background
color.
Effects - plug-ins - Penta.com - Dot and Color -
setting is right -
click OK.
Effects - plug-ins - FM Tile Tools - Blend Emboss -
default setting
- click Apply.
Selections - select none.
6.
Layers - merge - merge down.
Effects - 3D Effects - drop shadow -
with this setting.
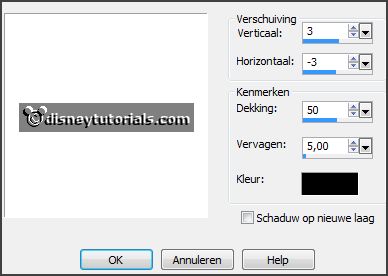
Repeat the drop shadow - now with vert. -3 en horz. 3.
7.
Activate the top layer.
Effects - plug-ins -
Xenoflex2 - Burnt Edges -
with this setting -
click
OK.
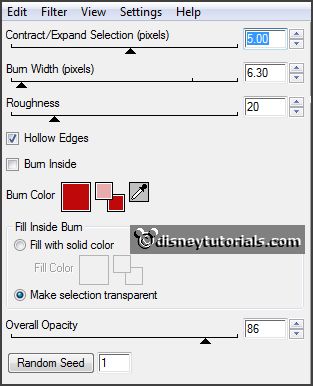
Image - add border 2 pixels - symmetric - background color.
Image - add border 10 pixels -
symmetric - foreground color.
Image - add border 2 pixels -
symmetric - background color.
8.
Activate the tube DBV Valentine Collab WA(4) - edit - copy.
Edit - paste as a new layer on the image.
9.
Activate the tube DBV Valentine Collab WA(3) -
edit - copy.
Edit - paste as a new layer on the image.
10.
Activate the tube DBV Valentine Collab WA(2) -
edit - copy.
Edit - paste as a new layer on the image.
Lock the 2 top layers.
11.
Activate the tube DBV Valentine Collab Frame(5) -
edit - copy.
Edit - paste as a new layer on the image.
Effects - 3D Effects - drop shadow
-
with this setting.

12.
Activate the tube DBV Valentine Collab element (40) -
edit - copy.
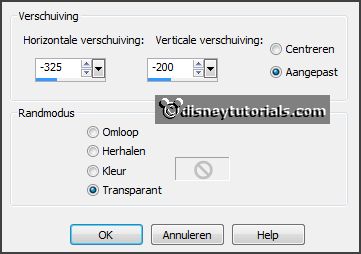
Edit - paste as a new layer on the image.
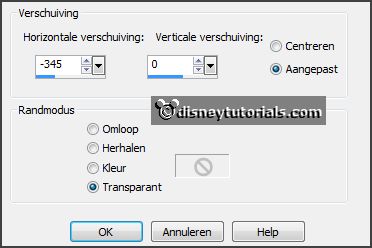
Effects - Image effects - offset -
with this setting.
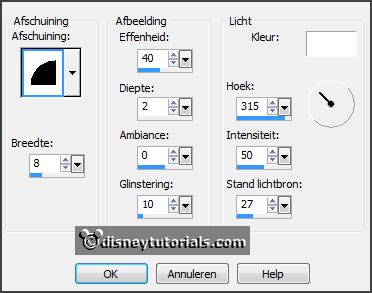
Effects - 3D Effects - Inner Bevel -
with this setting.
Activate selection tool - rectangle - and make a selection - as below - click at
the delete key.
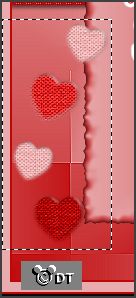
Selections - select none.
13.
Layers - duplicate.
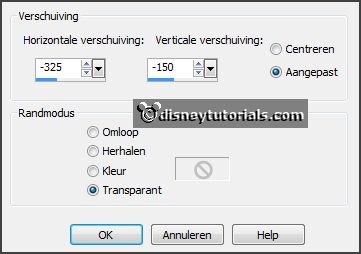
Image - mirror.
Effects - Image effects - offset
-
with this setting.
14.
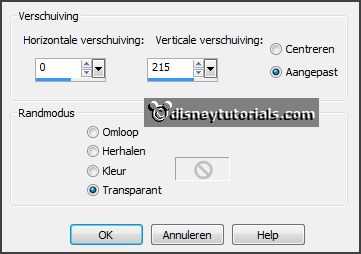
Activate the tube duffyval2.
Image - free rotate -
with this setting.

Edit - copy.
Edit - paste as a new layer on the image.
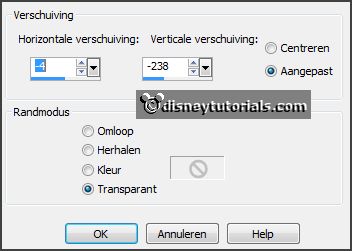
Effects - Image effects - offset
-
with this setting.

Set the opacity of this layer to 50.
15.
Activate free hand selection tool - from point to point -
and make a selection - as below -
click at the delete key.
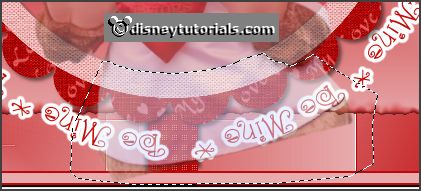
Selections - select none.
Set the opacity back to 100.
16.
Activate the tube DBV Valentine Collab element (29) -
edit - copy.
Edit - paste as a new layer on the image.
Effects - 3D Effects - drop shadow -
setting is right.
Activate move tool - set the tube at the top right - see example.
17.
Activate the tube DBV Valentine Collab element (16) -
edit - copy.
Edit - paste as a new layer on the image.
Effects - Image effects - offset
-
with this setting.
Effects - 3D Effects - drop shadow -
setting is right.
18.
Activate the tube DBV Valentine Collab element (21) -
edit - copy.
Edit - paste as a new layer on the image.
Effects - Image effects - offset
-
with this setting.
Effects - 3D Effects - drop shadow -
setting is right.
19.
Activate the tube DBV Valentine Collab element (20) -
edit - copy.
Edit - paste as a new layer on the image.
Effects - Image effects - offset -
setting is right.
Effects - 3D Effects - drop shadow -
setting is right.
20.
Activate the tube DBV Valentine Collab element (23) -
edit - copy.
Edit - paste as a new layer on the image.
Effects - Image effects - offset -
setting is right.
Effects - 3D Effects - drop shadow -
setting is right.
Lock the 2 top layers.
21.
Activate the tube DBV Valentine Collab bow (6) -
edit - copy.
Edit - paste as a new layer on the image.
Effects - Image effects - offset
-
with this setting.
Effects - 3D Effects - drop shadow -
setting is right.
22.
Activate the tube DBV Valentine Collab element (8) -
edit - copy.
Edit - paste as a new layer on the image.
Effects - Image effects - offset
-
with this setting.
Effects - 3D Effects - drop shadow -
setting is right.
23.
Layers - new raster layer -
put your watermark into the image.
Activate the bottom layer.
Edit - copy merged.
Open Animation Shop.
24.
Edit - paste as a new animation.
Back in PSP.
Lock raster 1 and 9 and open raster 2 and 10.
Edit - copy merged.
25.
In AS -
paste after active frame.
Back in PSP.
Lock raster 2 and 10 and open
raster 3 and 11.
Edit - copy merged.
26.
In AS -
paste after active frame.
Edit - select all.
Animation - Frame properties - at 110.
Animation - resize format of animation -
with this setting.
27.
File - save as - give name - click 3 times at next and than at finish.
Ready is the tag
I hope you like this tutorial.
greetings Emmy
Thank you Nelly for testing.

tutorial written
25-01-2014