
This
Tutorial is copyrighted to the Tutorial Writer, © Emmy Kruyswijk October 2011.
This Tutorial
may
not be forwarded, shared or otherwise placed on any Web Site or group without written
permission from
Emmy Kruyswijk
Do you want to link my lessons?
Please send
me a mail.
Materials:

1 image, 1 accent,
1 bow, 1 gold pattern.
filter: Penta.com - Jeans
Download
here
Put the plug-ins in the folder plug-ins, put the
patterns in the folder pattern.
Open the image, accent and bows in PSP
Minnie Fiesta
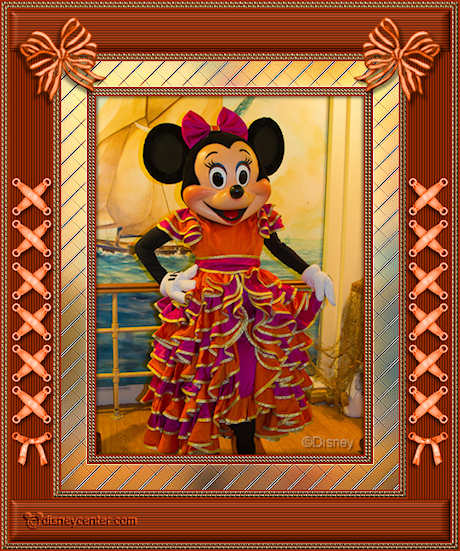
Foreground color #a32e01 - background at gold pattern.
1.
Open your image - Shift+D - and close the original image.
Image - add border 2 pixels - symmetric - foreground color.
Image - add border 3 pixels - symmetric - color white.
Select the white border - fill this with the gold pattern.
Effects - 3D Effects - Inner Bevel - with this setting.
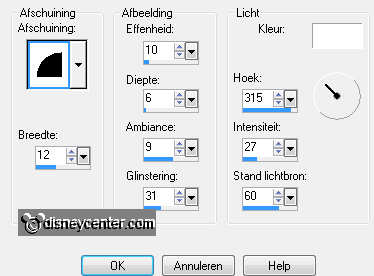
Selections - select none.
Image - add border 1 pixels - symmetric - foreground color.
Image - add border 3 pixels - symmetric - color white.
Select the white border - fill this with the gold pattern.
Effects - 3D Effects - Inner Bevel - with the same setting.
Selections - select none.
Image - add border 2 pixels - symmetric - foreground color.
2.
Selections - select all - selections - modify - contract 11.
Effects - 3D Effects - Cutout - with this setting.
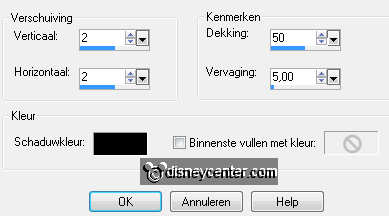
Repeat Cutout - now with -2.
Edit - Copy.
Selections - select none.
3.
Image - add border 30 pixels - symmetric - color white.
Select the white border - new raster layer - paste in selection.
Adjust - Blur - Gaussian Blur - radius at 15,00.
Effects - Penta.com - Jeans - with this setting.
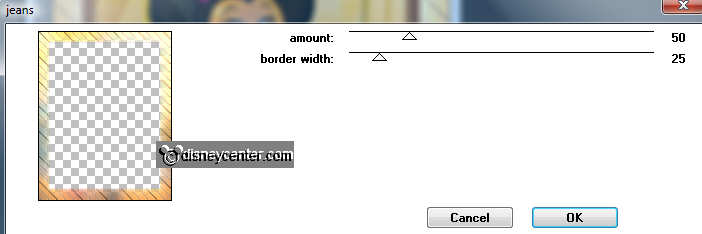
Effects - Edge Effects - Enhance.
Selections - select none.
4.
Duplicate this layer - image - mirror.
Effects - Edge Effects - Enhance.
Image - add border 2 pixels - symmetric - foreground color.
Image - add border 3 pixels - symmetric - color white.
Select the white border - fill this with the gold pattern.
Effects - 3D Effects - Inner Bevel - with the same setting as in point 1.
Selections - select none.
Image - add border 1 pixels - symmetric - foreground color.
Image - add border 3 pixels - symmetric - color white.
Select the white border - fill this with the gold pattern.
Effects - 3D Effects - Inner Bevel - with the same setting as in point 1.
Selections - select none.
Image - add border 2 pixels - symmetric - foreground color.
5.
Image - add border 50 pixels left and right - NOT symmetric - color white.
Select the white borders - fill this with the foreground color.
Effects - texture effects - Blinds - with this setting.
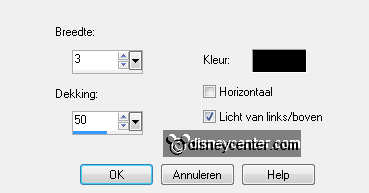
Selections - select none.
Image - add border 50 pixels top and bottom - NOT symmetric - color white.
Select the white borders - fill this with the foreground color.
Effects - texture effects - Blinds - with this setting - with this setting.
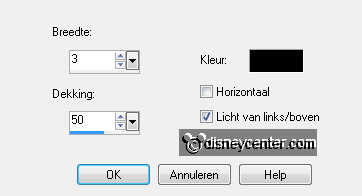
Effects - 3D Effects - Inner Bevel- with the same setting as in point 1.
Selections - select none.
6.
Copy des-itha-element and paste as a new layer on the image
Image - resize format 85% - all layers not checked.
Place this at the left side on the blinds - 200 pixels from the top.
Effects - 3D Effects - drop shadow - with this setting.
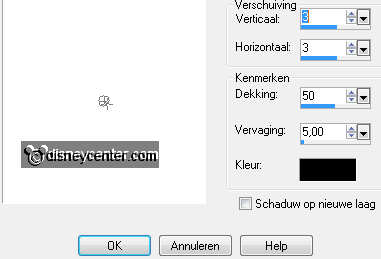
Duplicate this layer - image - mirror.
7.
Open R&R_Accents Bows_Set03 - copy 04 - paste as a new layer on the
image
Give the same drop shadow as in point 6.
Place this in the upper right corner.
Image - free rotate - with this setting.
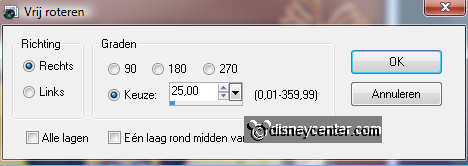
Duplicate this layer - image - mirror.
8.
Image - add border 2 pixels - symmetric - foreground color.
Image - add border 3 pixels - symmetric - color white.
Select the white border - fill this with the gold pattern.
Effects - 3D Effects - Inner Bevel - with the same setting as in point 1.
Selections - select none.
Image - add border 1 pixels - symmetric - foreground color.
Image - add border 3 pixels - symmetric - color white.
Select the white border - fill this with the gold pattern.
Effects - 3D Effects - Inner Bevel - with the same setting as in point 1.
Selections - select none.
Image - add border 2 pixels - symmetric - foreground color.
9.
New raster layer - put your watermark into the image.
Image - resize format 85% - all layers checked.
File - export - JPEG optimizer.
Ready is the tag
I hope you like this tutorial.
greetings Emmy,
Tested by Bep

Tutorial written
09-10-2011

