|

This
Tutorial is copyrighted to the Tutorial Writer, © Emmy Kruyswijk
06-02-2013.
This Tutorial
may
not be forwarded, shared or otherwise placed on any Web Site or group without written
permission from
Emmy Kruyswijk.
Many of the material are made by me.
Please respect my work and don't change the file names.
At all Disney creations must be copyrighted.
Do you want to link my lessons?
Please send
me a mail.
Needing:
5
tubes, 2 word-art, - made by me.
1 image- unknown.
Plug-ins: I.C.NET Software - Filters Unlimited 2.0 -
& Bkg Designer sf10 II - Facet offset,
Download here
Animatie Shop
Before you begins.......
Open the tubes, images and word-art in PSP,
Set the plug-ins in the folder
plug-ins.
Material

Mardi Gras

1.
File - open new transparent image 700x500.
Convert to raster layer.
Set in the material palette the foreground color on #e9ae17
and the background color on 528821.
2.
Selections - select all.
Activate the image mardigras - edit - copy.
Edit - paste into selection.
Selections - select none.
3.
Adjust - blur - Gaussiane blur - radius 20.
Effects - Image effects - seamless tiling - with this setting.
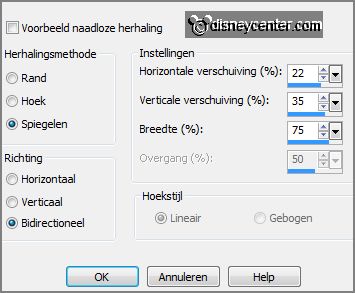
Edit - paste (is still in memory) as a new layer
on the image.
4.
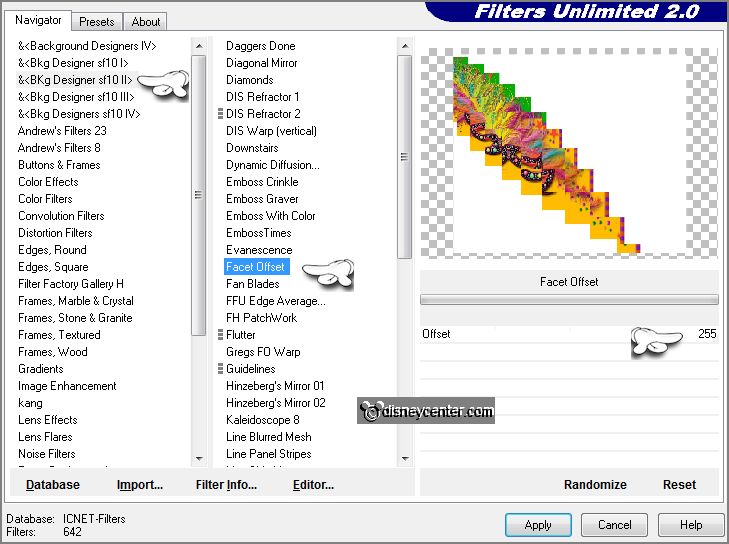
Effects - plug-ins - I.C.NET Software Filters Unlimited 2.0 - & Bkg Designer
sf10 II - Facet offset - with this setting -
click Apply.
Activate the magic wand with setting below.

Select the white squares - click at the delete key.
Selections - select none.
5.
Objects - Align - left - objects - Align - top.
Activate selection tool and pull this down.

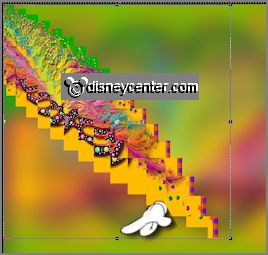
Set selection tool back to move tool.
6.
Effects - Distortion effects - pixelate - with this setting.
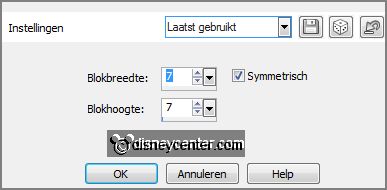
Layers - duplicate.
Image - mirror.
Layers - merge - merge down.
Effects - Image effects - seamless tiling - default setting.
Effects - Image effects - enhance.
7.
Select with the magic wand in the middle.
Selections - modify - expand 30 pixels - click at the delete key.
Layers - new raster layer.
Fill the selection with the foreground color.
Selections - modify - contract 3 pixels - click at the delete key.
Selections - select none.
8.
Activate raster 2.
Effects - 3D Effects - drop shadow - with this setting.
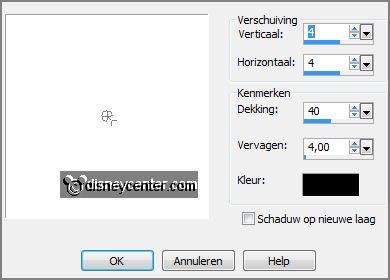
Image - add border - symmetric 3 - foreground
color.
Image - add border - symmetric 30 - background color.
Image - add border - symmetric 3 - foreground color.
9.
Select with the magic wand the green border.
Adjust - add/remove noise - add noise - with this setting.
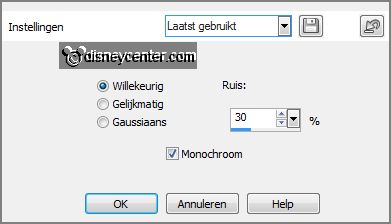
Selections - select none.
10.
Activate the tube Emmymask2 - edit - copy.
Edit - paste as a new layer on the image.
Effects - Image effects - offset - with this setting.
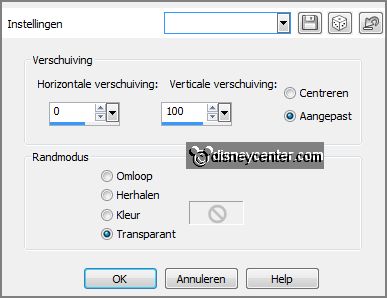
Effects - 3D Effects - drop shadow - setting is
right.
11.
Activate the tube Emmymask4 -
edit - copy.
Edit - paste as a new layer on the image.
Effects - Image effects - offset - setting is right
Effects - 3D Effects - drop shadow -
setting is right.
12.
Activate the tube Emmymask3 -
edit - copy.
Edit - paste as a new layer on the image.
Effects - Image effects - offset - setting is right
Effects - 3D Effects - drop shadow -
setting is right.
13.
Activate the tube Emmymask5 - edit - copy.
Edit - paste as a new layer on the image.
Effects - Image effects - offset - with this setting.
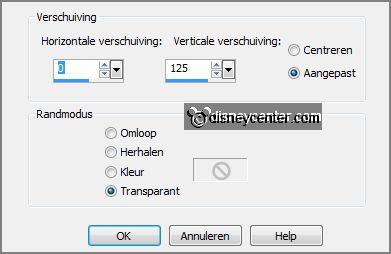
Effects - 3D Effects - drop shadow - setting is
right.
14.
Activate the word-art-Emmymardigras -
edit - copy.
Edit - paste as a new layer on the image.
Effects - Image effects - offset - setting is right.
Effects - 3D Effects - drop shadow -
setting is right.
Lock in the layer palette the top 4 layers.
15.
Activate the tube Emmygoofycarnaval - edit - copy.
Edit - paste as a new layer on the image.
Effects - Image effects - offset - with this setting.
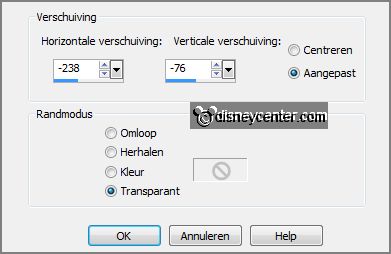
Effects - 3D Effects - drop shadow - setting is
right.
16.
Layers - duplicate.
Image - mirror.
Image - resize 50% - all layers not checked.
Activate move tool - set the tube right - see example.
17.
Activate the word-art-goofy -
edit - copy.
Edit - paste as a new layer on the image.
Place this in the middle at the bottom.
If you use your own tube, make than a different word-art.
18.
Image - resize 90% - all layers checked.
Layers - new raster layer - put your watermark into the image.
19.
Make the bottom layer active.
Edit - copy merged.
20.
Open Animatie Shop - paste as a new animation.
Back in PSP - doe raster1 op slot en open raster2.
Edit - copy merged.
21.
In AS - paste after active frame.
Back in PSP - doe raster2 op slot en open raster3.
Edit - copy merged.
22.
In AS - paste after active frame - be sure the last frame is always selected.
Back in PSP - doe raster3 op slot en open raster4.
Edit - copy merged.
23.
In AS - paste after active frame.
Back in PSP - doe raster4 op slot en open raster5.
Edit - copy merged.
24.
In AS -
paste after active frame.
Animation - Frame properties - set the first 4 frames at 100 and the last frame
at 200.
File - save - give name - click
3 times at next and than at finish.
Ready is the tag
I hope you like this tutorial.
greetings Emmy
Tested by Nelly

tutorial written 08-02-2013.
|