3 tubes, 1 word-art
and 1 animation, made by me.
Plug-ins:
Scribe - 4 Way Mirror
Graphics Plus - Cross Shadow
AAA Frames - Texture Frame
Simple - Diamonds
download here
Before you begins.......
Open the tubes and word-art in PSP.
Set the plug-ins in the folder plug-ins
Material

In Love

1.
File - open new transparent image
700x700.
Set in the material palette the foreground color at
#d14784
and the background color at
#f6cge6.
Make from the foreground a gradient radial - with this setting.

Activate
flood fill tool - fill the layer with the gradient.
2.
Layers - duplicate.
Image - flip.
Set in the layer palette the opacity to 50.
Layers - merge - merge down.
3.
Effects - Image effects - seamless tiling - with this setting.

Effects - plug-ins - AAA Frames - Texture Frame - with this setting -
click OK.

4.
Layers - duplicate.
Image - resize 75% - all layers not checked.
Effects - plug-ins - Simple - Diamonds.
Effects - 3D Effects - drop shadow - with this setting.
Repeat the drop shadow - now with horz. and vert. at -5.
Layers - merge - merge down.
Effects - plug-ins - Scribe - 4 Way Mirror - with this setting - click OK.

5.
Activate the tube bloemen - edit - copy.
Edit - paste as a new layer on the image.
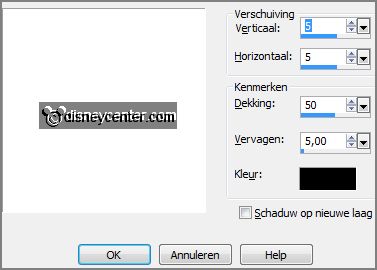
Effects - Image effects - offset - with this setting.

Set in the layer palette the opacity
to
28.
6.
Image - add borders 3 pixels - symmetric - foreground color.
Image - add borders 30 pixels - symmetric - background color.
Image - add borders 3 pixels - symmetric - foreground color.
7.
Activate the magic wand - with setting below - select the white border.

Fill the selection with the gradient.
Effects - plug-ins - Graphics Plus - Cross Shadow - with this setting - click OK.

Promote layer to selection.
Selections - select none.
8.
Layers - duplicate.
Image - flip.
Set in the layer palette the opacity to 50.
Layers - merge - merge down.
9.
Activate the tube decoEmmy11 - edit - copy.
Edit - paste as a new layer on the image.
Activate move tool - set the tube to the left side - see example.
Effects - 3D Effects - drop shadow - with this setting.
Layers - duplicate.
Image - mirror.
Layers - merge - merge down.
10.
Activate the tube word-art-Emmylove - edit - copy.
Edit - paste as a new layer on the image.
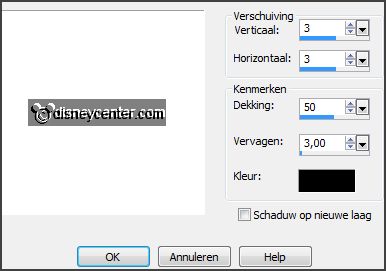
Effects - Image effects - offset - with this setting.

11.
Activate the tube micmin4 - edit - copy.
Edit - paste as a new layer on the image.
Effects - Image effects - offset - with this setting.

Effects - 3D Effects -
drop shadow - setting is right.
12.
Layers - new raster layers - put your watermark into the image.
Layers - merge - merge
all.
Image - resize 85% - all layers checked.
13.
Edit - copy.
Open Animation Shop - paste as a new animation.
Animation - Insert Frames - empty frames - with this setting.

Edit - select all.
14.
Open animation Emmyhartjes1 - edit - select all.
Edit - copy.
Edit - paste in selected frames.
Place this in the left upper corner - see example.
15.
Back to the hartjes animation.
Animation - mirror.
Edit - copy.
Edit - paste in selected frames.
Place this in the right upper corner - see example.
16.
File - save as - give name - click 3 times at next and than at
finish.
Ready is the tag
I hope you like this tutorial.
greetings Emmy