|

This
Tutorial is copyrighted to the Tutorial Writer, © Emmy Kruyswijk
02-01-2013.
This Tutorial
may
not be forwarded, shared or otherwise placed on any Web Site or group without written
permission from
Emmy Kruyswijk.
Many of the material are made by me.
Please respect my work and don't change the file names.
At all Disney creations must be copyrighted.
Do you want to link my lessons?
Please send
me a mail.
Needing:
2 tubes, 2 selections and 1 animation - made by me.
1 tube
unknown,
1 font and 1 gold pattern.
Filters: Penta.com – Dot and Cross, - download
here.
Animatie Shop.
Before you begins.......
Open the tubes in PSP,
Put the plug-ins in the folder plug-ins, the
selections in the folder selections and the pattern in the folder pattern.
Minimize the font or install this.
Material

Just Showing

1.
File - open new transparent image 700x500.
Set in the material palette the foreground on #a9b9bb and the background on #456d8c.
Make from the foreground a gradient radial - with this setting.
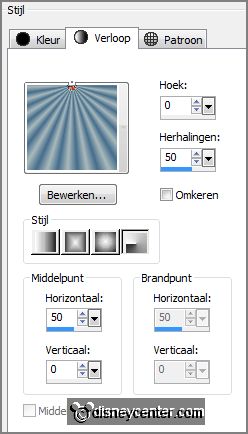
2.
Activate flood fill tool - fill the layer with the gradient.
Layers - duplicate.
Effects - Geometrics effects - perspective horizontal -
with this setting.
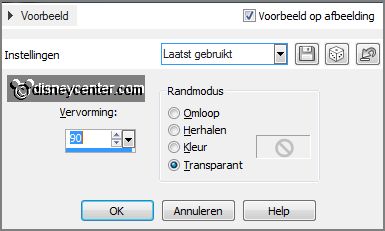
3.
Image - resize 50% - all layers not checked.
Objects - Align - left.
Layers - duplicate - image - mirror.
4.
Layers - merge - merge down.
Objects - Align - top.
Layers - duplicate - image -
flip.
Layers - merge - merge down.
5.
Activate the magic wand - with setting below - select as below.

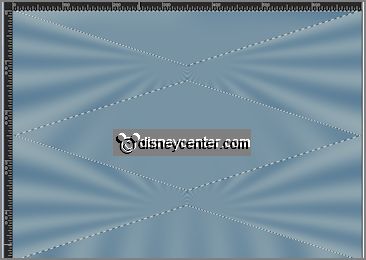
Layers - new raster layer.
Fill the selection with the background color.
Effects - Texture effects - Blinds -
with this setting.
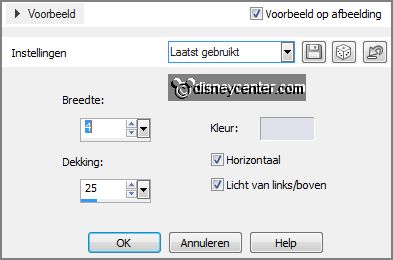
6.
Layers - new raster layer.
Set in the material palette the foreground at pattern gold - angle 0 - scale 100.
Fill the selection with the gold pattern.
7.
Selections - modify - contract 3 pixels - click at the delete key.
Selections - select none.
Layers - merge - merge down - and 1 more time.
8.
Layers - new raster layer.
Selections - load/save selection - load selection from disk - look
Emmyrijtuig -
with this setting.
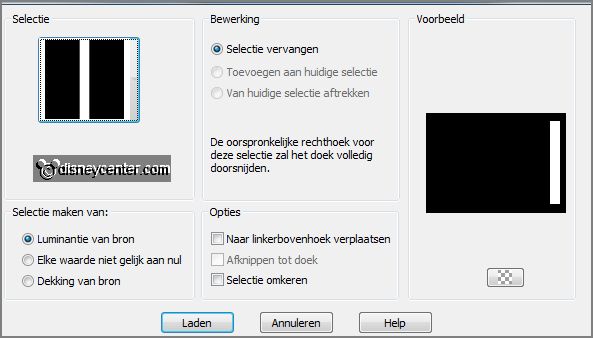
Fill the selection with the background color.
Effects - plug-ins - Penta.com - Dot and Cross -
with this setting.
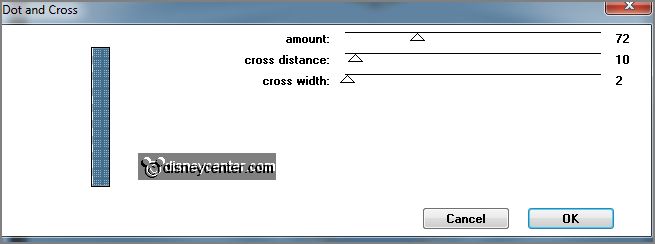
9.
Layers - new raster layer.
Fill the selection with the gold pattern.
Selections - modify - contract 3 pixels - click at the delete key.
Selections - select none.
Layers - merge - merge down.
10.
Layers - duplicate.
Image - resize 75% - all layers not checked.
Layers - duplicate.
Image - resize 75% - all layers not checked.
Layers - duplicate.
Image - resize 75% - all layers not checked.
Layers - duplicate.
Image - resize 75% - all layers not checked.
Layers - duplicate.
Image - resize 75% - all layers not checked.
Layers - duplicate.
Image - resize 75% - all layers not checked.
You have now 7 of this layers.
11.
Lock the 2 bottom layers and make raster 2 active.
Layers - merge - merge all visible.
Effects - 3D Effects - drop shadow -
with this setting.
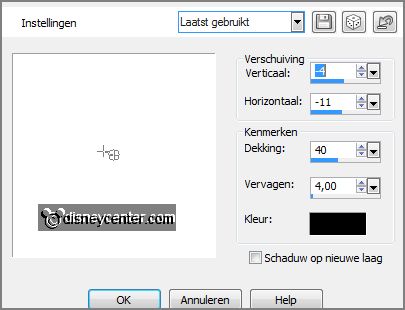
12.
Layers - duplicate - image - mirror.
Layers - merge - merge down.
13.
Layers - new raster layer.
Selections - load/save selection - load selection from disk - look
Emmyrijtuig1 -
with this setting.
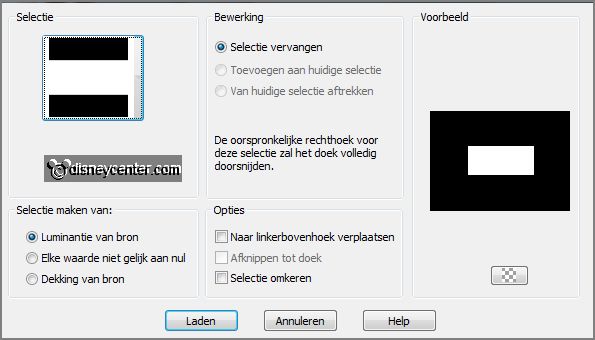
Fill the selection with the background color.
14.
Layers - new raster layer.
Fill the selection with the gold pattern.
Selections -
modify - contract 3 pixels -
click at the delete key.
Selections - select none.
15.
Layers - merge - merge down.
Layers - duplicate.
Image - resize 85% - all layers not checked.
16.
Layers - duplicate.
Image - resize 85% - all layers not checked.
Layers - arrange - move down. Set the 2 copy layers under raster2.
17.
Make the top layer active.
Activate text tool -
with this setting.

18.
Set in the material palette your gold pattern at the background and lock the
foreground.
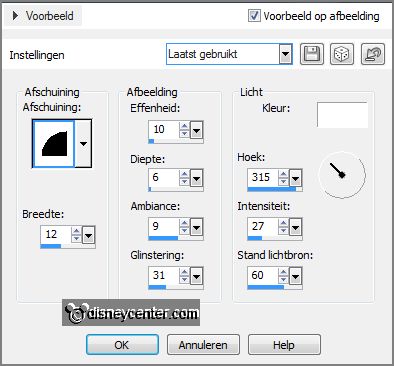
Write- Just - convert to raster layer.
Effects - 3D Effects -Inner bevel -
with this setting.
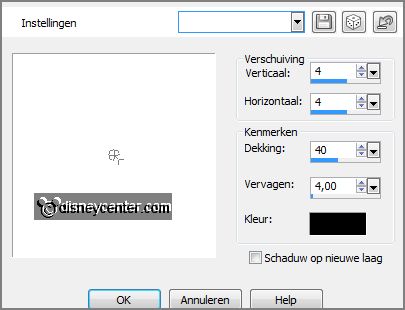
Effects - 3D Effects - drop shadow -
with this setting.
19.
Activate move tool - move the text in the top square - see example.
Write - Showing - convert to raster layer.
Effects - 3D Effects - Inner bevel - setting is right.
Effects - 3D Effects - drop shadow - setting is right.
move the text in the middle
square - see example.
20.
Activate the tube obdft232 - edit - copy.
Edit - paste as a new layer on the image.
Move the tube at the bottom right - see example.
Effects - 3D Effects - drop
shadow - setting is right.
21.
Activate the tube cind&prince - edit - copy.
Edit - paste as a new layer on the image.
Effects - 3D Effects - drop shadow -
setting is right.
Move the tube to the left side - see example.
22.
Activate text tool - write - our new - convert to raster layer.
Write - Coach - convert to raster layer.
Layers - merge - merge down.
23.
Move the text in the bottom square - see example.
Effects - 3D Effects - Inner bevel - setting is
right.
Effects - 3D Effects - drop shadow -
setting is right.
24.
Activate the tube versiering -
edit - copy.
Edit - paste as a new layer on the image.
Move the tube in the middle at the top - see example.
25.
Layers - new raster layer - put your watermark into the image.
Layers - merge - merge all.
26.
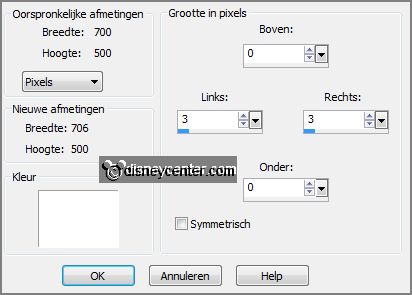
Image - add border - symmetric not checked -
with this setting
- color white.
Activate the magic wand - select the white border.
Fill the selection with the gold pattern.
Effects - 3D Effects - Inner bevel -
setting is right.
Selections - select none.
27.
Edit - copy.
Open Animation shop - edit - paste as a new animation.
Edit - duplicate selected - edit - select all.
28.
Open animation Emmyglitter - edit - select all.
Edit - paste into selected frames.
29.
Set the animation in the middle at the top - see example. Or where you like it.
Again every time - paste into selected frames.
30.
File - save as - give name - click 3 times at next
and than at finish.
Ready is the tag
I hope you like this tutorial.
greetings Emmy
Tested by Nelly

Tutorial written 02-01-2013.
|