This is a long tutorial, take your time.
1.
File – open new transparent image 700x700.
Put in the material palette the foreground on #a4ab96 and the background on #685c46.
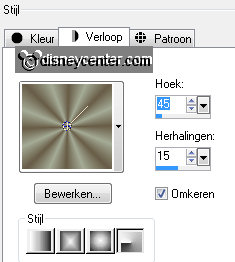
2.
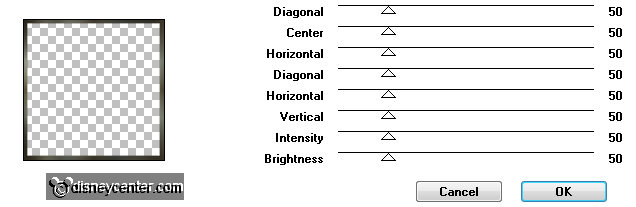
Make from the foreground a gradient radial – with this setting.
Activate flood fill tool and fill the layer with the gradient.
3.
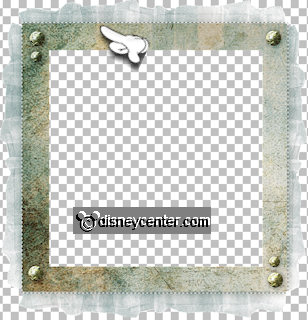
Open from the scrapkit – Frame2 – edit – copy.
Edit – paste as a new layer on the image.
Activate the magic wand- with the setting below – select inside the
frame.

4.
Layers - new raster layer.
Selections – modify – expand 10 pixels.
Put the foreground back on color.
5.
Activate flood fill tool – fill the selection with the foreground color.
Selections – select none.
Layers – arrange – move down.
6.
Make raster 2 active.
Activate selection tool – selection – rectangle – and pull a rectangle round the
outside border of the frame – see below.
Selections – invert – click at the delete key.
Selections – select none.
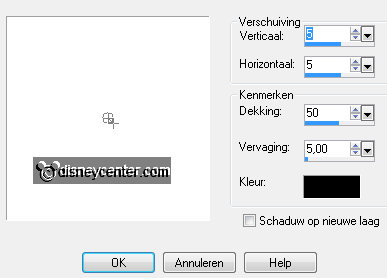
Effects – 3D Effects – drop shadow - with this setting.
7.
Open from the scrapkit Divider – edit - copy.
Image – resize 65% - all layers not checked.
Edit – paste as a new layer on the image.
Effects – 3D Effects – drop shadow – setting is right.
Move with with the move tool the tube a little down.
8.
Open from the scrapkit Bench – edit - copy.
Edit – paste as a new layer on the image.
Image – resize 75% - all layers not checked.
Move the tube right at the bottom – see example.
Effects – 3D Effects – drop shadow – setting is right.
9.
Open from the scrapkit Ivy.
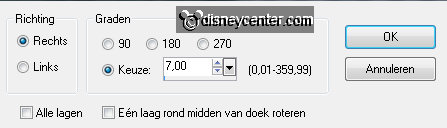
Image – rotate right.
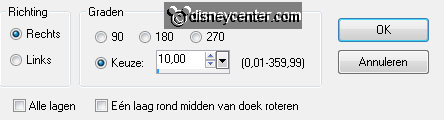
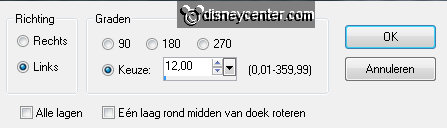
Image – free rotate – with this setting.

10.
Image - resize 85% - all layers checked.
Edit - copy.
Edit – paste as a new layer on the image.
Move this with the move tool to the left side of the frame.
11.
Effects – 3D Effects – drop shadow – setting is right.
Layers – duplicate.
Image – resize 75% - all layers not checked.
Image – free rotate – with this setting.
Move this with the move tool to the other branch.
12.
Open from the scrapkit Leaves1.
Image – resize 50% - all layers checked.
Edit - copy.
Edit – paste as a new layer on the image.
13.
Move this on the top side of the frame – see example.
Effects – 3D Effects – drop shadow – setting is right.
Image – free rotate– with this setting.
14.
Open from the scrapkit String Tie.
Activate eraser tool – size on 20 - and erase the top part. You keep this.
Edit - copy.
Edit – paste as a new layer on the image.
Move this on the top side of the frame – see example.
Layers – arrange – move down.
15.
Open from the scrapkit Charme.
Image – resize 25% - all layers checked.
Edit - copy.
Edit – paste as a new layer on the image.
16.
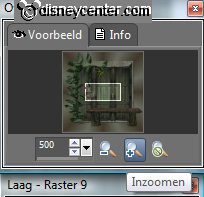
Move this on the on the bottom loop of the string tie – see example.
Enlarges the image to 500 in your overview – see below.
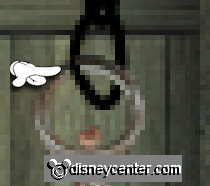
17.
Activate the eraser – put this back to 1 and erase the part below.
Put the image back to 100 in de overview.
Effects – 3D Effects – drop shadow – setting is right.
18.
Activate the top layer.
Open from the scrapkit flower1.
Image – resize 2x 50% - all layers checked.
19.
Activate eraser tool – size on 15 – and erase the stem.
Edit - copy.
Edit – paste as a new layer on the image.
Move this left at the top of the branches.
20.
Effects – 3D Effects – drop shadow – setting is right.
Layers – duplicate.
Image – resize 75% - all layers not checked.
Move this on the little branch – see example.
21.
Open from the scrapkit flower2.
Image – resize 25% - all layers checked.
Edit - copy.
Edit – paste as a new layer on the image.
Move this left at the inner side of the bench – see example.
Effects – 3D Effects – drop shadow – setting is right.
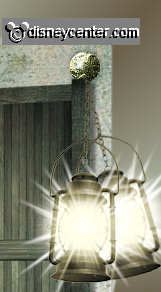
22.
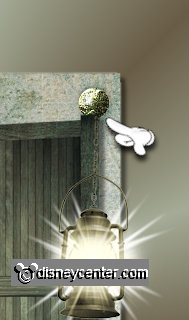
Open from the scrapkit Lantern – edit - copy.
Image – resize 50% - 1 time with 75% - all layers not checked.
Edit – paste as a new layer on the image.
Activate move tool – move the lantern as below.
23.
Open from the scrapkit Lawn.
Image – resize 30% - all layers checked.
Move the tube left at the bottom – see example.
Layers – arrange – move down - below the Bench layer.
Make raster 6 active – layers - arrange – move down – below the grass
layer (raster 13)
24.
Activate the top layer.
Open from the scrapkit Fireflieswbottle.
Image – resize 15% - all layers checked.
25.
Edit - copy.
Edit – paste as a new layer on the image.
Move this left near the bench.
Effects – 3D Effects – drop shadow – setting is right.
26.
Open from the scrapkit Rose.
Image – resize 25% - all layers checked.
Image – rotate right.
27.
Image - Flip.
Image – free rotate – with this setting.
Edit - copy.
Edit – paste as a new layer on the image.
28.
Image - mirror.
Move the rose on the bench at the right side.
29.
Activate the tube minsafari – edit - copy.
Edit – paste as a new layer on the image.
Move this in the middle of the image – see example.
Effects – 3D Effects – drop shadow – setting is right.
30.
Layers – new raster layer – put your watermark into the image.
Lock the layer with the lantern (raster 12 by me).
31.
Activate the bottom layer.
Layers – merge – merge all visible.
32.
Selections – select all.
Selections – modify – contract 15 pixels.
Selections – invert.
33.
Put the foreground back to gradient.
Fill the selection with the gradient radial – setting is right.
Effects – plug-ins – Graphics Plus – Cross Shadow – with this setting.
34.
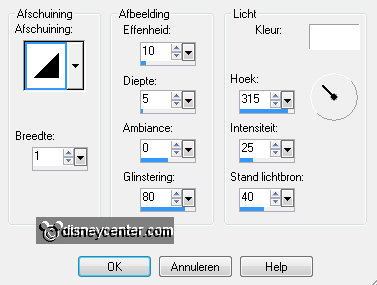
Effects – 3D Effects – Inner Bevel – with this setting.
Selections – select none.
35.
Image – resize 85% - all layers checked.
If you don't want to make your animation, save your image as JPEG.
Further with the Animation.
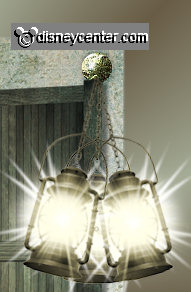
36.
Open raster 12.
Layers - duplicate (the lantern)
37.
Image – free rotate – with this setting.

Place the lantern as below.
Layers – duplicate.
38.
Image – mirror.
Place the lantern as below.
39.
Activate copy of raster 12.
Layers – arrange – move down.
40.
Lock the 2 top layers – make the bottom layer active.
Edit – copy merged.
Open animation shop – edit – paste as a new animation.
41.
Back in PSP – lock copy of raster12 and open raster12.
Edit – copy merged.
Back in AS – edit - paste after active frame.
42.
Back in PSP – lock raster12 and open copy(2) of raster12.
Edit – copy merged.
Back in AS – edit - paste after active frame. Be sure the last frame is always
selected.
43.
Back in PSP – lock copy(2) of raster12 and open raster12.
Edit – copy merged.
Back in AS – edit - paste after active frame.
44.
Back in PSP – lock raster12 and open copy of raster12.
Edit – copy merged.
Back in AS – edit - paste after active frame.
45.
Edit – select all.
Animation – Frame properties at 35.
File – save as – give name – click 3 times at next and than at finished.