|

This
Tutorial is copyrighted to the Tutorial Writer, © Emmy Kruyswijk 03-02-2012.
This Tutorial
may
not be forwarded, shared or otherwise placed on any Web Site or group without written
permission from
Emmy Kruyswijk
At all Disney creations must be copyrighted.
Do you want to link my lessons?
Please send
me a mail.
Needing
2 images from Elena Dudina -
download here
1 image background 6 (pag.6 - second rij -third image)
1 image Rio Jamara2 (pag.1 - third rij - first image)
2 Lion King images are
by materials.
1 selection and 1 word-art made by me.
1 mask 20-20
Plug-ins: CPK Design – FM Tile Tools -
download here
Before you begins.......
Open the images, word-art in PSP,
Put the selection in the folder selections.
Put the mask in the folder mask.
Put the plug-ins in the folder plug-ins.
Materials
Beautiful Nature

1. Set in the material palette the foreground on a light
color (#894119) and the background on a dark color (#551900).
2. File – new – new transparent image 600x450.
3. Activate Flood Fill Tool - fill the image with the dark color.
4. Layers – new raster layer.
5. Selections – select all.
6. Activate the image Rio Jamara2_elenadudina-d4g270i – edit – copy.
7. Edit – paste into selection.
8. Selections – select none.
9. Set in the layer palette the Blend mode at Luminance (Legacy).
10. Effects – Edge Effects – enhance.
11. Selections – load/save selections – load selections from disk – look
Emmynature – with this setting.
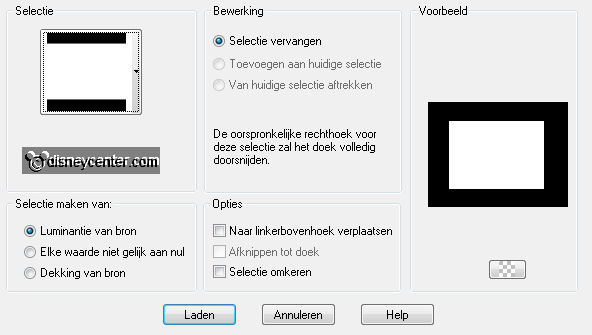
12. Layers – new raster layer.
13. Activate the flood fill – fill the layer with the background color.
14. Effects – 3D Effects – drop shadow – with this setting.

15. Layers – new raster layer.
16. Activeer plaatje background 6_elenadudina-d24yosz – edit – copy.
17. Edit – paste into selection.
18. Selections – select none
19. Layers – Load/save mask – load mask from disk – look 20-20 – with this
setting.
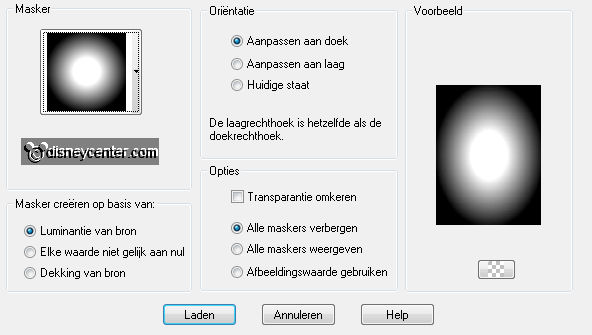
20. Layers – merge – merge group.
21. Set in the layer
palette the blend mode at Luminance.
22.Layers – merge – merge down.
23. Effects – plug-ins – FM Tile Tools – Blend Emboss – default setting.
24. Repeat FM Tile Tools – Blend Emboss one more time – default setting.
25. Activate the image LionKingCoverSmall – image - resize 50% - all layers
checked.
26. Layers – Load/save mask – load mask from disk – look 20-20 – setting are
good.
27. Layers – merge – merge group.
28. Edit – copy.
29. Edit – paste as a new layer on the image.
30. Activate Move tool – put the misted tube left at the top– see example.
31. Effects – Edge effects – enhance.
32. Effects – plug-ins – FM Tile Tools – Blend Emboss – default setting.
33. Activate the image The-Lion-King - image - resize 50% - all layers checked.
34. Layers – Load/save mask – load mask from disk – look 20-20 – setting are
good.
35 Layers – merge – merge group.
36. Edit - copy.
37. Edit – paste as a new layer on the image.
38 Set de misted tube with the move tool right at the bottom – see example.
39. Effects – Edge effects – enhance.
40. Effects – plug-ins – FM Tile Tools – Blend Emboss – default setting.
41. Set in the layer palette the Blend mode of both misted tube layers at Luminance
(Legacy).
42. Activate the top layer.
43. Layers – new raster layer.
44. Selections – select all.
45. Selections – modify – contract 25.
46. Selections – invert.
47. Make from the foreground a gradient linear – with this setting.
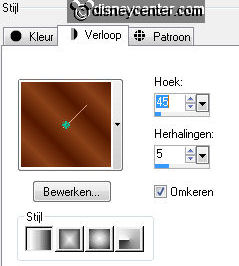
48. Fill with the Flood Fill the selection with the gradient.
49. Effects – plug-ins – CPK Design – CPK Spin – with this setting.

50. Effects – Edge effects – enhance more.
51. Effects – 3D Effects – Inner Bevel – with this setting.
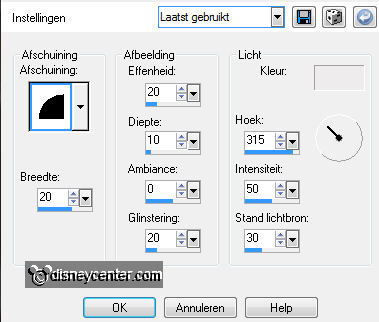
52. Selections – select none.
53. Activate word-art beautiful – edit – copy
54. Edit - paste as a new layer on the image.
55. Put the word-art with Move Tool – left at the bottom.
56. Layers – new raster layer –set the copyright at the image.
57. Layers – merge – merge all.
58. File – export – JPEG Optimizer.
Ready is the tag
I hope you like this tutorial.
greetings Emmy
Tested by Cobie.

Tutorial written 31-03-2012
|