Pearl
Frame
Coloring pattern or accent. Here's how to do.
Click the foreground color - you see this screen.
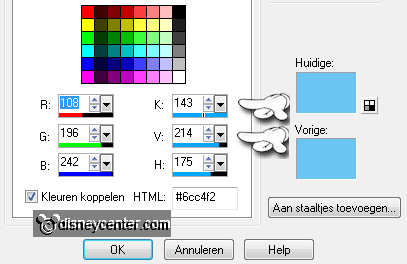
Go to Adjust - Hue and Saturation - Colorize.
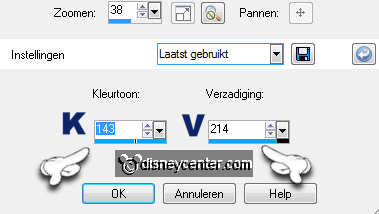
As you enter the numbers that K 143 and V 214 in the previous graphic.
1.
Open your image do shift + D and close your original image.
Image - add border 10 pixels - symmetric checked - color white.
Select the white border with the magic wand - with this setting.

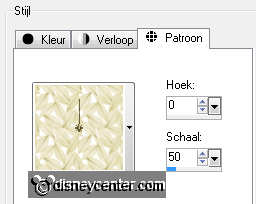
Fill this with pattern bladeren 13 with this setting.
Adjust - Hue and Saturation - colorize - with your color.
Effects - Edge Effects - Enhance more.
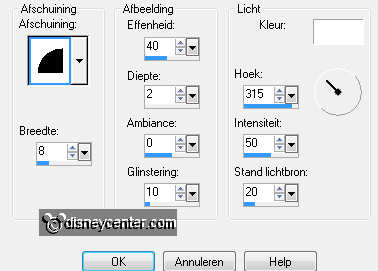
Effects - 3D Effects - Inner Bevel with this setting.
2.
Selections - select all - selection - modify - contract 10 pixels.
Effects - 3D Effects - Cutout - with this setting.
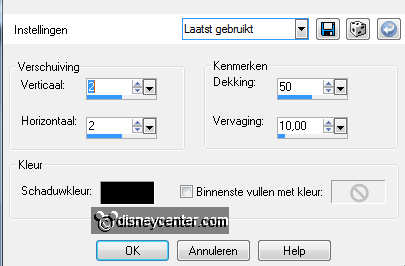
Repeat Cutout now with -2, -2.
Selections - select none.
3.
Image - add border 2 pixels - symmetric checked - background color.
Image - add border 2 pixels - symmetric checked - foreground color.
Image - add border - left and right 20 pixels- top and bottom 0 -
symmetric NOT checked - color white.
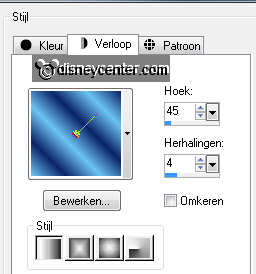
Select the white borders - fill this with gradient linear - with this setting.
Give the same Inner Bevel as in point 1.
Selections - select none.
4.
Image - add border - left and right 0 pixels- top and bottom 20 -
symmetric NOT checked - color white.
Select the white borders - fill this with pattern blueglass - setting is right.
Give the same Inner Bevel as in point 1.
Selections - select none.
5.
Image - add border 2 pixels - symmetric checked - background color.
Image - add border 2 pixels - symmetric checked - foreground color.
Image - add border 10 pixels - symmetric checked - color white.
Select the white border with the magic wand - setting is right.
Fill this pattern bladeren 13 setting is right.
Adjust - Hue and Saturation - colorize - with your color.
Effects - Edge Effects - Enhance more.
Give the same Inner Bevel as in point 1.
Selections - select none.
6.
Image - add border 2 pixels - symmetric checked - background color.
Image - add border 2 pixels - symmetric checked - foreground color.
Image - add border - left and right 20 pixels- top and bottom 0 -
symmetric NOT checked - color white.
Select the white borders - fill this with pattern blueglass - setting is right.
Give the same Inner Bevel as in point 1.
Selecties - niets selecteren.
7.
Image - add border - left and right 0 pixels- top and bottom 20 -
symmetric NOT checked - color white.
Select the white borders - fill this with pattern blueglass - setting is right.
Give the same Inner Bevel as in point 1.
Selections - select none.
8.
Image - add border 2 pixels - symmetric checked - background color.
Image - add border 2 pixels - symmetric checked - foreground color.
Image - add border 10 pixels - symmetric checked - color white.
Select the white border with the magic wand - setting is right.
Fill this pattern bladeren 13 setting is right.
Adjust - Hue and Saturation - colorize - with your color.
Effects - Edge Effects - Enhance more.
Give the same Inner Bevel as in point 1.
Selections - select none.
9.
Image - add border 2 pixels - symmetric checked - background color.
Image - add border 2 pixels - symmetric checked - foreground color.
Copy parel accent - paste as a new layer at the image.
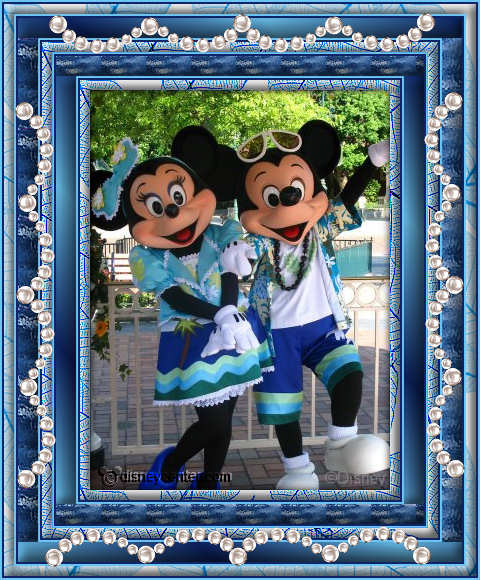
Place this in the middle at the top - see example.
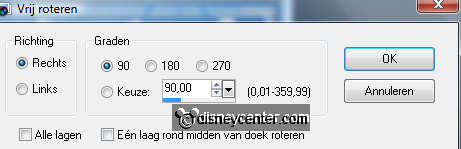
Duplicate this layer - image - free rotate - with this setting.
Layers - merge - merge down.
Duplicate this layer - image - mirror - image - flip.
New raster layer - put your watermark into the image.
Layers - merge - merge all.
Ready is the tag
I hope you like this tutorial.
greetings Emmy
Tested by Bep

Tutorial written
22-09-2011