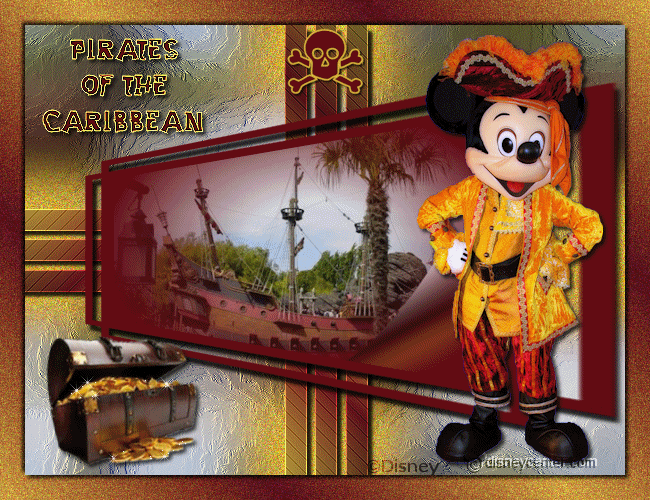
Pirates of the Caribbean
1. Set in the material palette the foreground on a light color (#d8b33e) and the
background on a dark color (#610a12) from the tube.
2. File – new – open new transparent image 600x450.
3. Activate Flood Fill Tool – fill the layer with the foreground color.
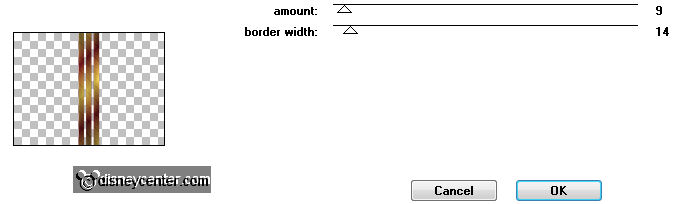
4. Adjust – Add/Remove Noise – Add Noise – with this setting.
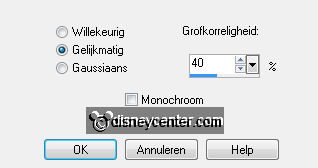
Click OK
5. Activate the image – Image– add border 5 pixels – symmetric – background
color.
6.
Edit - copy.
7.
Edit - paste as a new layer on the image.
8. Effects – Image effects – seamless tiling – default setting.
9. Adjust – blur – Gaussian blur – radius at 20.
10. Effects – Art Media effects – brush strokes – with this setting.

Click OK
11. Layers – new raster layer.
12. Activate Flood Fill tool – fill the layer with the background color.
13. Layers – Load/Save mask –load mask from disk – look 186 – with
this setting.
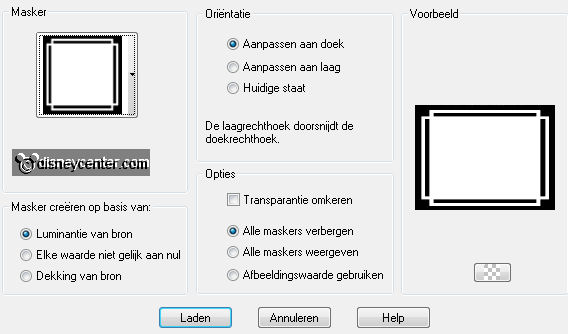
Click Load
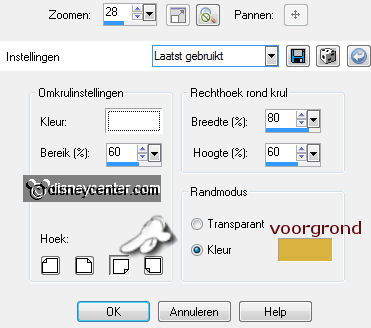
14. Layers – merge – merge group.
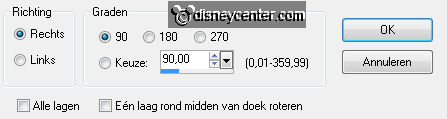
15. Effects – Geometric effects – Perspective horizontal – with this
setting.
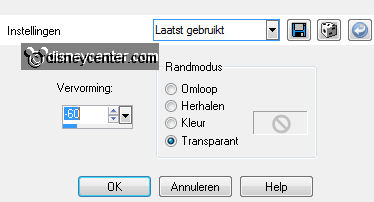
Click OK
16. Effects – plug-ins – Alien Skin Eye Candy5 – Impact – Perspective
Shadow – click at Settings – user setting – Emmypirates.
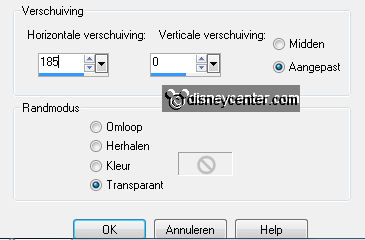
17. Effects – Image effects – Offset – with this setting.
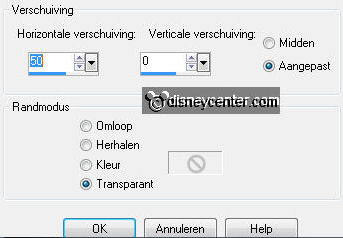
Click OK
18. Layers – new raster layer.
19. Selections – Load/Save selection – Load selection from disk – look
Emmypirates1 – with this setting.
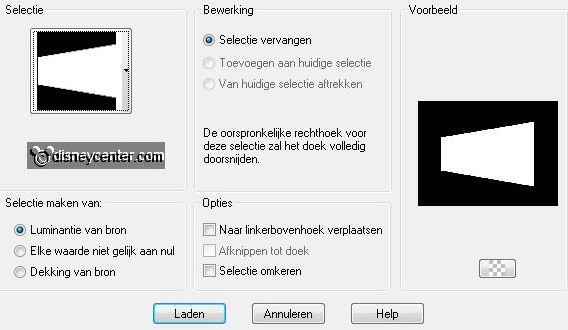
Click Load
20. Activate the misted tube – edit – copy.
21. Edit – paste into selection.
22. Effects – Image effects – Page Curl – with this setting.
Click OK
23. Selections – select none.
24. Layers – merge – merge down.
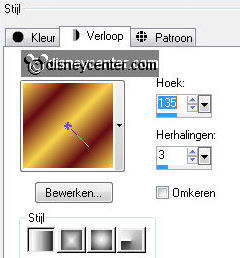
25. Make in the material palette from the foreground gradient linear – with this
setting.
26. Layers – new raster layer.
27. Selections – load/save selection – load selection from disk – look
Emmypirates2 – settings are right.
28. Activate Flood Fill tool – fill the selection with the gradient.
29. Selections – select none.
30. Effects – plug-ins – Graphics Plus – Cross Shadow – all at 50.
31. Effects – plug-ins – Penta.com – Jeans – with this setting.
Click OK
32. Effects – Edge effects – enhance.
33. Effects – plug-ins – Alien Skin Eye Candy5 – Impact – Perspective
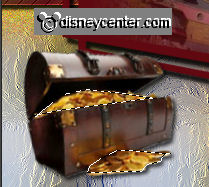
Shadow – click op Settings – user setting – Emmypirates.
34. Layers - duplicate.
35. Image – free rotate – with this setting.
Click OK
36. Move this layer with the move tool to the left side.
37. Layers – merge – merge down.
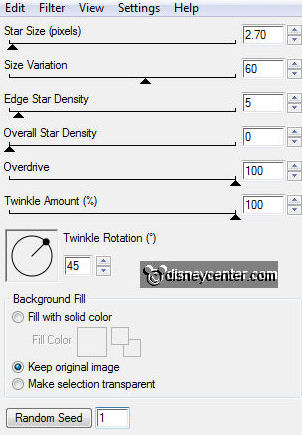
38. Layers – arrange – move down.
39. Activate the top layer.
40. Activate the tube (micpiraat) – edit – copy.
41. Edit - paste as a new layer on the image.
42. Effects – Image effects – offset – with this setting.
Click OK
43. Effects – 3D Effects – drop shadow – with this setting.
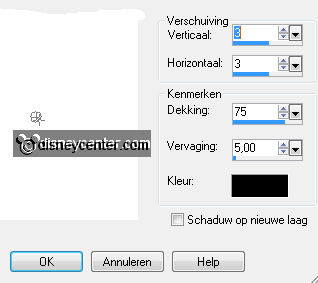
Click OK
44. Activate text tool – with this setting.
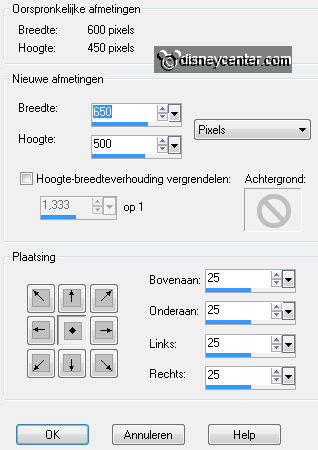
Set in the material palette the foreground back to color.

45. Write the text with capital (Pirates of the Caribbean)– convert to raster
layer.
46. Move the text with the move tool left at the top – see example.
47. Effects – 3D Effects – drop shadow – settings are right.
48. Effects – Edge effects – enhance.
49. Activate the tube doodskop – edit – copy.
50. Edit - paste as a new layer on the image.
51. Move this with the move tool in the middle at the top.
52. Activate the little tube (schatkist) – edit - copy.
53. Edit - paste as a new layer on the image.
54. Activate move tool –move thee tube to - left at the bottom.
55. Activate freehand selection tool (lasso) – from point to point – and select
as below.

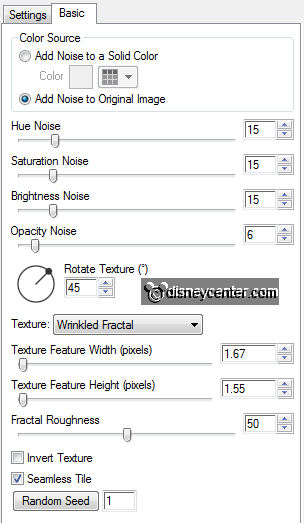
56. Layers – duplicate – duplicate this twice.
57. Lock in the layer palette the 2 top layers, by clicking at the eye.
58. Activate the original layer from the schatkist. (raster7)
59. Effects – plug-ins – Alien Skin Xenoflex 2 – Constellation – with
this setting.
60. Lock in the layer palette raster7 and open copy of raster7 - make this layer
active.
61. Repeat Xenoflex2 – Constellation – settings are right – click only at
Random Seed.
62. Lock in the layer palette copy of raster7 and open copy(2) of raster7
– make this layer active.
63. Repeat Xenoflex2 – Constellation – settings are right – click only at
Random Seed.
64. Selections – select none.
65. Layers – new raster layer.
66. Put the watermark into the image.
67. Image – canvas size – with this setting.
Click OK
68. Selections – select all.
69. Selections – modify - contract 25.
70. Selections – invert.
71. Layers – new raster layer.
72.
Set in the material palette the foreground color back to gradient.
73. Activate flood fill tool –fill the selection with the gradient – settings
are right.
74. Selections – invert.
75. Effects – 3D Effects – drop shadow – settings are right.
76. Repeat the drop shadow – now with horz. and vert. at -3
77. Selections – select none.
78. Layers – duplicate – duplicate this layer twice.
79. Lock in the layer palette the top 2 layers (copy).
80. Activate raster9.
81. Effects – plug-ins – Alien Skin Eye Candy 5 Textures – Texture Noise
– with this setting.
82. Lock in the layer palette raster9 and open copy of raster9 and activate this
layer.
83. Repeat Texture Noise – settings are right – click only at Random
Seed.
84. Lock in the layer palette copy of raster9 and open copy(2) of raster9 and
activate this layer.
85. Repeat Texture Noise – settings are right – click only at Random
Seed.
86. Lock now in the layer palette the copy layers of raster7 and raster9.
87. Make the bottom layer (raster1) active.
88. Edit – copy special – copy merged.
89. Open animation shop.
90. In AS - Edit – paste as a new animation.
91. Back in PSP – Lock in the layer palette raster7 and raster9 – open the copy
layers of raster7 and raster9
92. Edit – copy special – copy merged.
93. In AS - Edit – paste after active frame.
94. Back in PSP – Lock in the layer palette the copy layers of raster7 and raster9 – open
the copy(2) layers of raster7 and raster9.
95. Edit – copy special – copy merged.
96. In AS – Edit - paste after active frame. (Be sure that the last frame is always
selected)
97. File – save as – give name – click 3 times at next and than at finish.
Ready is the tag
I hope you like this tutorial.
greetings Emmy
Tested by Cobie,