1.
File - open new transparent image 700x700.
Activate the tube Mask 2 –
edit - copy.
Edit - paste as a new layer on the image.
2.
Activate the tube ABS_Hallowicious_element5 –
edit - copy.
Edit - paste as a new layer on the image.
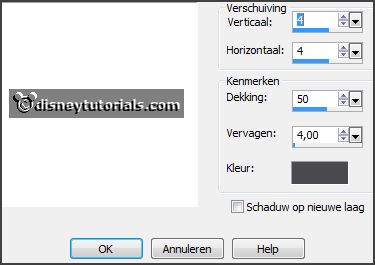
Effects - 3D Effects - drop shadow - with this setting.

Layers – duplicate.
Image – free rotate - with this setting.

Layers – merge – merge down.
3.
Activate the
poser tube -
edit - copy.
Edit - paste as a new layer on the image.
Activate move tool – place it at the left side.
Effects - 3D Effects - drop shadow - setting is right.
4.
Activate the
tube ABS_Hallowicious_element10 –
edit - copy.
Edit - paste as a new layer on the image.
Place it right at the top.
Effects - 3D Effects - drop shadow - setting is right.
5.
Activate the
tube word-art -
edit - copy.
Edit - paste as a new layer on the image.
Place it in the middle at the top – see example.
Effects - 3D Effects - drop shadow - setting is right.
6.
Activate the
tube halloween 26 -
edit - copy.
Edit - paste as a new layer on the image.
Place it in the middle
–
see example.
7.
Activate the
tube ABS_Hallowicious_element72 -
edit - copy.
Edit - paste as a new layer on the image.
Place it in the middle at the right side
–
see example.
Effects - 3D Effects - drop shadow - setting is right.
8.
Activate the
tube ABS_Hallowicious_element63 -
edit - copy.
Edit - paste as a new layer on the image.
Place it in the middle
–
see example.
Effects - 3D Effects - drop shadow - setting is right.
9.
Activate the
tube sl_36 -
edit - copy.
Edit - paste as a new layer on the image.
Place it right at the bottom –
see example.
Effects - 3D Effects - drop shadow - setting is right.
10.
Activate the
tube sl_14 -
edit - copy.
Edit - paste as a new layer on the image.
Place it right at the bottom
–
see example.
Effects - 3D Effects - drop shadow - setting is right.
11.
Activate the
tube KAaard_Halloweensampler_Boo -
edit - copy.
Edit - paste as a new layer on the image.
Place it in the middle at the bottom
–
see example.
Effects - 3D Effects - drop shadow - setting is right.
12.
Layers - new raster layer - set your watermark into the image.
Layers - merge - merge all visible layers.
File - export - PNG Optimizer.
Ready is the tag
I hope you like this tutorial.
greetings Emmy
Thank you Nelly for testing.