1.
File - open new transparent image 700x700.
Activate the tube background – edit - copy.
Edit - paste as a new layer on the image.
2.
Activate the tube BS16-Arbol – edit - copy.
Edit - paste as a new layer on the image.
Activate move tool – place it at the left side.
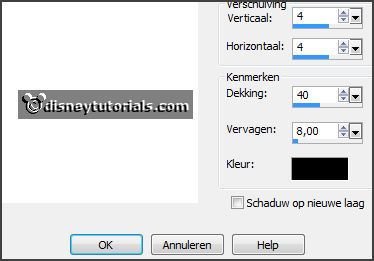
Effects - 3D Effects - drop shadow - with this setting.

3.
Activate the tube BS16-Marco2 – edit - copy.
Edit - paste as a new layer on the image.
Effects - 3D Effects - drop shadow - setting is right.
4.
Activate the poser tube – edit - copy.
Edit - paste as a new layer on the image.
Place it a little down – see example.
Erase the part, what comes under the frame.
Effects - 3D Effects - drop shadow - setting is right.
5.
Activate the tube BS16-Rama2 – edit - copy.
Edit - paste as a new layer on the image.
Place it at the left side – see example.
Effects - 3D Effects - drop shadow - setting is right.
6.
Activate the tube BS16-Oso – edit - copy.
Edit - paste as a new layer on the image.
Place it at the left side – see example.
Effects - 3D Effects - drop shadow - setting is right.
7.
Activate the tube BS16-Caja – edit - copy.
Edit - paste as a new layer on the image.
Place it left – see example.
Effects - 3D Effects - drop shadow - setting is right.
8.
Activate the tube BS16-Frutos2 – edit - copy.
Edit - paste as a new layer on the image.
Place it left at the bottom– see example.
Effects - 3D Effects - drop shadow - setting is right.
9.
Activate the tube BS16-Rama – edit - copy.
Edit - paste as a new layer on the image.
Place it left at the bottom– see example.
Effects - 3D Effects - drop shadow - setting is right.
10.
Activate the tube BS16-Patines – edit - copy.
Edit - paste as a new layer on the image.
Place it left at the bottom– see example.
Effects - 3D Effects - drop shadow - setting is right.
11.
Activate the tube BS16-Trineo – edit - copy.
Edit - paste as a new layer on the image.
Place it right at the bottom– see example.
Effects - 3D Effects - drop shadow - setting is right.
12.
Activate the tube BS16-Galletas – edit - copy.
Edit - paste as a new layer on the image.
Place it right in the middle – see example.
Effects - 3D Effects - drop shadow - setting is right.
13.
Activate the tube BS16-Fuelle – edit - copy.
Edit - paste as a new layer on the image.
Place it right on the sled – see example.
Effects - 3D Effects - drop shadow - setting is right.
14.
Activate the tube BS16-Frasco – edit - copy.
Edit - paste as a new layer on the image.
Place it in the middle on the sled – see example.
Effects - 3D Effects - drop shadow - setting is right.
15.
Activate the tube BS16-Campana – edit - copy.
Edit - paste as a new layer on the image.
Place it in the middle at the bottom– see example.
Effects - 3D Effects - drop shadow - setting is right.
16.
Activate the tube BS16-Ramo – edit - copy.
Edit - paste as a new layer on the image.
Place it right at the bottom– see exampled.
Effects - 3D Effects - drop shadow - setting is right.
17.
Activate the tube BS16-Pajarito – edit - copy.
Edit - paste as a new layer on the image.
Place it right at the top – see example.
Effects - 3D Effects - drop shadow - setting is right.
18.
Activate the tube SoCold – edit - copy.
Edit - paste as a new layer on the image.
Place it right at the top– see exampled.
Effects - 3D Effects - drop shadow - setting is right.
19.
Layers - new raster layer - set your watermark into the image.
Layers - merge - merge all visible layers.
File - export - PNG Optimizer.
Ready is the tag
I hope you like this tutorial.
greetings Emmy
Thank you Nelly for testing.