|

This
Tutorial is copyrighted to the Tutorial Writer, © Emmy Kruyswijk.
This Tutorial may not be forwarded, shared or otherwise placed on any Web Site
or group without written
permission from
Emmy Kruyswijk.
Please respect my work and from others, don't change the file
names.
Do you want to link my lessons?
Please send
me
a mail.
Needing:
The poser tube is from me. My site you can find
here.
If you
use my tubes put than the copyright render at the image.
I use parts of different scrapkit.
Before you begins.......
Open the tubes in PSP.
Material

Sint at the Roof

1.
File - open new transparent image 700x700.
Activate the tube mask -
edit - copy.
Edit - paste as a new layer on the image.
2.
Activate the tube frames -
edit - copy.
Edit - paste as a new layer on the image.
Activate move tool - place it left at the top.
3.
Activate the tube nacht2 -
edit - copy.
Edit - paste as a new layer on the image.
Place it in the upper frame.
Layers - arrange - down.
4.
Activate the tube nacht1 -
edit - copy.
Edit - paste as a new layer on the image.
Place it in the bottom frame.
Activate the top layer.
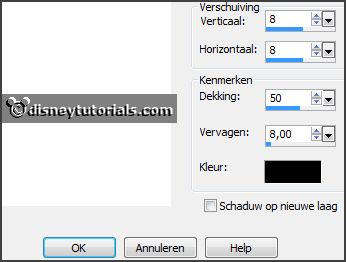
Effects - 3D Effects - drop shadow - with this setting.

5.
Activate the tube zakkado's -
edit - copy.
Edit - paste as a new layer on the image.
Place it right at the bottom.
Effects - 3D Effects - drop shadow - setting is right.
6.
Activate the poser tube -
edit - copy.
Edit - paste as a new layer on the image.
Place it right at the bottom on the bag.
Effects - 3D Effects - drop shadow - setting is right.
7.
Activate the tube boek -
edit - copy.
Edit - paste as a new layer on the image.
Place it right of the frames.
Effects - 3D Effects - drop shadow - setting is right.
8.
Activate the tube chocolade kaart -
edit - copy.
Edit - paste as a new layer on the image.
Place it for the book.
Effects - 3D Effects - drop shadow - setting is right.
9.
Activate the tube schoen5 -
edit - copy.
Edit - paste as a new layer on the image.
Place it left at the bottom.
Effects - 3D Effects - drop shadow - setting is right.
10.
Activate the tube sint-chocoladelolly -
edit - copy.
Edit - paste as a new layer on the image.
Place it in the middle - see example.
Layers - arrange - under raster5.
Effects - 3D Effects - drop shadow - setting is right.
11.
Layers - new raster layer - set your watermark into the image.
Layers - merge - merge all visible layers.
File - export - PNG Optimizer.
Ready is the tag
I hope you like this tutorial.
greetings Emmy
Thank you Nelly for testing.


tutorial written 05-10-2016
|