This
Tutorial is copyrighted to the Tutorial Writer, © Emmy Kruyswijk.
This Tutorial may not be forwarded, shared or otherwise placed on any Web Site
or group without written
permission from Emmy Kruyswijk.
Please respect my work and from others, don't change the file names.
Do you want to link my lessons?
Please send me a mail.
Needing:
The poser tube is a buy tube of me. Is not by the material. You can buy it
here.
Before you begins.......
Open the tubes in PSP.
Material

Sinterklaas kapoentje

1.
File - open new transparent image 700x700.
Activate the tube mask -
edit - copy.
Edit - paste as a new layer on the image.
Activate move tool - move it a little up.
2.
Activate the tube schouw -
edit - copy.
Edit - paste as a new layer on the image.
Place it to the left - see example.
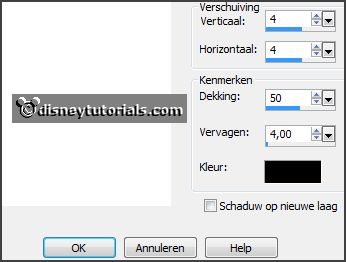
Effects - 3D Effects - drop shadow - with this setting.

3.
Activate the image vuur -
edit - copy.
Edit - paste as a new layer on the image.
Place it on the tube schouw.
Layers - arrange - down.
Place it good.
Activate the top layer.
4.
Activate the tube deco -
edit - copy.
Edit - paste as a new layer on the image.
Place it left on the tube schouw.
Effects - 3D Effects - drop shadow - setting is right.
5.
Activate the tube pendule -
edit - copy.
Edit - paste as a new layer on the image.
Place it in the middle of the tube schouw.
Effects - 3D Effects - drop shadow - setting is right.
6.
Activate the tube saskia_tubes_doos01 -
edit - copy.
Edit - paste as a new layer on the image.
Place it right at the bottom.
Effects - 3D Effects - drop shadow - setting is right.
7.
Activate the tube klomp -
edit - copy.
Edit - paste as a new layer on the image.
Place it in the middle of the bottom.
Effects - 3D Effects - drop shadow - setting is right.
8.
Activate the tube beer -
edit - copy.
Edit - paste as a new layer on the image.
Place it left near the tube klomp at the bottom.
Effects - 3D Effects - drop shadow - setting is right.
9.
Activate the tube zak-trs -
edit - copy.
Edit - paste as a new layer on the image.
Place it left at the bottom.
Layers - arrange - down.
Activate the top layer.
Effects - 3D Effects - drop shadow - setting is right.
10.
Activate the tube wordart-sinterklaaskapoentje_MarinetteDesigns -
edit - copy.
Edit - paste as a new layer on the image.
Place it left at the top.
Effects - 3D Effects - drop shadow - setting is right.
11.
Activate the poser tube -
edit - copy.
Edit - paste as a new layer on the image.
Place it left near the tube klomp at the bottom.
Effects - 3D Effects - drop shadow - setting is right.
Lock raster 1 and 3.
12.
Activate raster 2.
Layers - new raster layer - set your watermark into the image.
Layers - merge - merge all visible layers.
Open raster 1 and 3 and lock merge raster.
Layers - merge - merge all visible layers.
Edit - copy.
13.
Open animation shop - edit - paste as a new animation.
Edit - duplicate selection - and 1 more time. (3 frames).
Edit - select all.
Open geanimeerde haard.
Edit - select all.
Edit - copy.
Edit - paste in selected frames.
Place exactly on the fire.
14.
Back to PSP.
Open the merge layer with the piet and lock the bottom merge layer.
Edit - copy.
In AS - edit - paste as a new animation.
Edit - duplicate selection - and 1 more time. (3 frames).
Edit - select all.
Edit - copy.
Edit - paste in selected frames.
Place it on the animated fire.
15.
File - save as - save - 3 times at next - finish.
Ready is the tag
I hope you like this tutorial.
greetings Emmy
Thank you Nelly for testing.