|

This
Tutorial is copyrighted to the Tutorial Writer, © Emmy Kruyswijk.
This Tutorial may not be forwarded, shared or otherwise placed on any Web Site
or group without written
permission from
Emmy Kruyswijk.
Please respect my work and don't change the file names.
Do you want to link my lessons?
Please send
me a mail.
Needing:
The beautiful poser tube is Gerda and should not be
shared. Her site can be found
here
If you want to use this tube, you
need to download the tube from her site.
I
used parts from the scrapkits from Vogue of
Bee Creations.
3 tube and 1 mask.
Before you begins.......
Open the tubes in PSP.
Material

At the Sea

1.
File - open new transparent image 700x700.
Activate the mask -
edit - copy.
Edit - paste as a new layer on the image.
2.
Activate the tube MRD_ dark_sand -
edit - copy.
Edit - paste as a new layer on the image.
Activate move tool - set at the bottom.
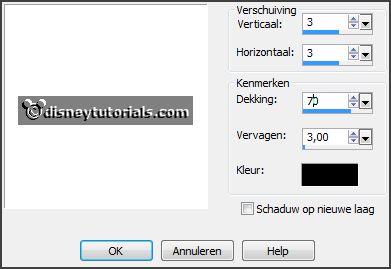
Effects - 3D Effects - drop shadow - with this setting.

3.
Activate the tube bee_vogue_el111 -
edit - copy.
Edit - paste as a new layer on the image.
Image - free rotate - with this setting.

Place it a little up.
4.
Layers - duplicate.
Image - mirror.
Set the opacity of this layer at 50.
Layers - merge - merge down.
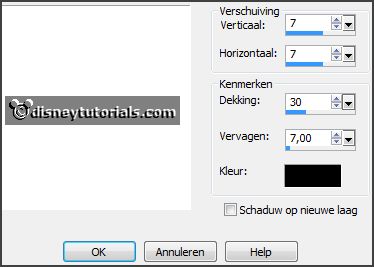
Effects - 3D Effects - drop shadow - with this setting.

5.
Layers - new raster layers.
Activate the magic wand - select in the middle of the frame.
Selections - modify - expand 20 pixels.
6.
Activate the image zee -
edit - copy.
Edit - paste in selection.
Layers - arrange - down.
Selections - select none.
Activate the top layer.
7.
Activate the tube bee_vogue_el124 -
edit - copy.
Edit - paste as a new layer on the image.
Place it at the left side - see example.
Layers - arrange - down.
Activate the eraser and erase the stem under the frame.
8.
Activate the tube StarlightDesigns-)ByeSummer element26 -
edit - copy.
Edit - paste as a new layer on the image.
Place it at the right side - see example.
Effects - 3D Effects - drop shadow - setting is right.
9.
Activate the tube bee_vogue_el82 -
edit - copy.
Edit - paste as a new layer on the image.
Place it at the right side - see example.
Effects - 3D Effects - drop shadow - setting is right.
10.
Activate the tube bee_vogue_el134 -
edit - copy.
Edit - paste as a new layer on the image.
Place it left near the boat - see example.
Effects - 3D Effects - drop shadow - setting is right.
11.
Activate the tube bee_vogue_el109 -
edit - copy.
Edit - paste as a new layer on the image.
Place it in the middle at the bottom - see example.
Effects - 3D Effects - drop shadow - setting is right.
12.
Layers - arrange - down.
Activate the tube bee_vogue_el133 -
edit - copy.
Edit - paste as a new layer on the image.
Place it left - see example.
Effects - 3D Effects - drop shadow - setting is right.
Layers - arrange - down.
13.
Activate the tube bee_vogue_el67 -
edit - copy.
Edit - paste as a new layer on the image.
Place it left - see example.
Effects - 3D Effects - drop shadow - setting is right.
Layers - arrange - down.
14.
Activate the top layer.
Activate the tube bee_vogue_el142 -
edit - copy.
Edit - paste as a new layer on the image.
Place it left at the bottom - see example.
Effects - 3D Effects - drop shadow - setting is right.
15.
Activate the tube bee_vogue_el18 -
edit - copy.
Edit - paste as a new layer on the image.
Place it in the middle at the sand - see example.
Effects - 3D Effects - drop shadow - setting is right.
16.
Activate the tube bee_vogue_el107 -
edit - copy.
Edit - paste as a new layer on the image.
Place it left at the frame - see example.
Effects - 3D Effects - drop shadow - setting is right.
17.
Activate the tube bee_vogue_el150 -
edit - copy.
Edit - paste as a new layer on the image.
Place it right at the bottom - see example.
Effects - 3D Effects - drop shadow - setting is right.
18.
Activate the tube bee_vogue_el142 -
edit - copy.
Edit - paste as a new layer on the image.
Place it left at the bottom - see example.
Effects - 3D Effects - drop shadow - setting is right.
19.
Activate the tube sak_shell07 -
edit - copy.
Edit - paste as a new layer on the image.
Place it right at the bottom - see example.
Effects - 3D Effects - drop shadow - setting is right.
20.
Activate the posertube - resize it if that is necessary -
edit - copy.
Edit - paste as a new layer on the image.
Place it as in the example.
Effects - 3D Effects - drop shadow - setting is right.
12.
Layers - new raster layer - set your watermark into the image.
Layers - merge - merge all visible layers.
File - export - PNG Optimizer.
Ready is the tag
I hope you like this tutorial.
greetings Emmy
Thank you Nelly for testing.


tutorial written
19-11-2014 |