This
Tutorial is copyrighted to the Tutorial Writer, © Emmy Kruyswijk.
This Tutorial may not be forwarded, shared or otherwise placed on any Web Site
or group without written
permission from Emmy Kruyswijk.
Please respect my work and from others, don't change the file names.
Do you want to link my lessons?
Please send me a mail.
Needing:
I use parts of different scrapkits.
The poser tube is a buy tube of me. Is not by the material. You can buy it
here.
Before you begins.......
Open the tubes in PSP
Material

I only Hunt 4 Pretty Eggs

1.
Open new transparent image 800x800.
Open Masker Marijke E10 – copy - paste on the image.
2.
Open frame – copy - paste on the image.
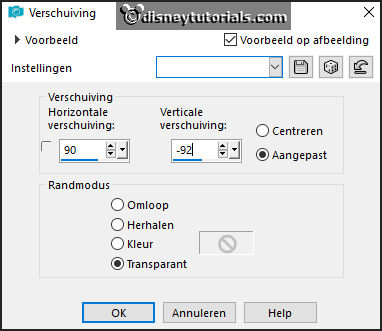
Effects – Image effects – offset – with this setting.

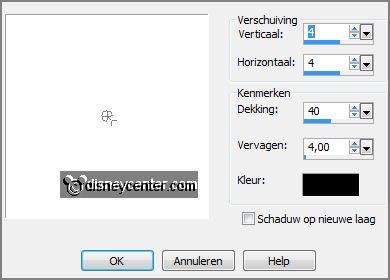
Give a drop shadow - with this setting.

3.
Open WA-E-VP – copy - paste on the image.
Place it in the middle of the frame.
4.
Open sg soil – copy - paste on the image.
Place it at the bottom.
Give the same drop shadow.
5.
Open de poser tube – copy - paste on the image.
Place it at the left side.
Give the same drop shadow.
6.
Open sl15 – copy - paste on the image.
Place it right on the grass – see example.
Give the same drop shadow.
7.
Open sl12 – copy - paste on the image.
Place it before the other 2.
Give the same drop shadow.
8.
Open kuiken_1 – copy - paste on the image.
Place it in the middle at the bottom.
Give the same drop shadow.
9.
Open kuiken_2 – copy - paste on the image.
Place it in the middle at the bottom - right near the other.
Give the same drop shadow.
10.
Open deco – copy - paste on the image.
Place it at the right side.
Give the same drop shadow.
Layers - arrange - down – under raster 2.
11.
Open takje – copy - paste on the image.
Place it at the right side - see example.
Give the same drop shadow.
12.
Open plant – copy - paste on the image.
Place it above the frame.
Give the same drop shadow.
Activate the top layer.
13.
Open butterf. – copy - paste on the image.
Place it right above the frame.
Give the same drop shadow.
14.
Open EWA13. – copy - paste on the image.
Place it left at the bottom.
15.
Layers - new raster layer - set your watermark into the image.
Layers - merge - merge all visible layers.
File - export - PNG Optimizer.
Ready is the tag
I hope you like this tutorial.
greetings Emmy