1.
File - open new transparent image 700x700.
Activate the tube gras -
edit - copy.
Edit - paste as a new layer on the image.
Activate move tool - set it at the bottom.
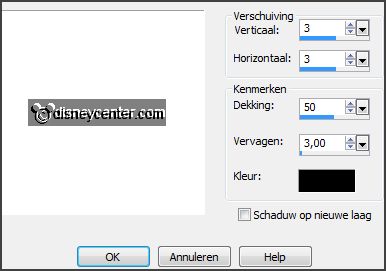
Effects - 3D Effects - drop shadow -
with this setting.
2.
Activate the tube 011 -
edit - copy.
Edit - paste as a new layer on the image.
Place it on the grass - see example.
Effects - 3D Effects - drop shadow - setting is right.
3.
Activate the tube 012 -
edit - copy.
Edit - paste as a new layer on the image.
Place it right on the grass -
see example.
Effects - 3D Effects - drop shadow - setting is right.
4.
Activate the tube 012a -
edit - copy.
Edit - paste as a new layer on the image.
Place it right on the grass a little up - see example.
Effects - 3D Effects - drop shadow - setting is right.
Layers - arrange - down.
Layers - merge - merge down.
5.
Activate the tube 024 -
edit - copy.
Edit - paste as a new layer on the image.
Place it left on the grass -
see example.
Effects - 3D Effects - drop shadow - setting is right.
6.
Activate the tube 032 -
edit - copy.
Edit - paste as a new layer on the image.
Place it left under the nest -
see example.
Effects - 3D Effects - drop shadow - setting is right.
7.
Activate the tube 053 -
edit - copy.
Edit - paste as a new layer on the image.
Image - mirror.
Place it left on the nest -
see example.
Effects - 3D Effects - drop shadow - setting is right.
8.
Activate the tube 065 -
edit - copy.
Edit - paste as a new layer on the image.
Place it left at the top of the wreath -
see example.
Effects - 3D Effects - drop shadow - setting is right.
9.
Activate the tube 069 -
edit - copy.
Edit - paste as a new layer on the image.
Place it right at the top -
see example.
Effects - 3D Effects - drop shadow - setting is right.
10.
Activate the tube flowers -
edit - copy.
Edit - paste as a new layer on the image.
Place it in the middle at the bottom -
see example.
Effects - 3D Effects - drop shadow - setting is right.
11.
Activate the poser tube -
edit - copy.
Edit - paste as a new layer on the image.
Image - mirror. If you use your own tube looks than whether it is necessary.
Place it right at the bottom -
see example.
Effects - 3D Effects - drop shadow - setting is right.
12.
Activate the tube bunny -
edit - copy.
Edit - paste as a new layer on the image.
Place it in the middle at the bottom -
see example.
Effects - 3D Effects - drop shadow - setting is right.
14.
Layers - new raster layer - set your watermark into the image.
Layers - merge - merge all visible layers.
File - export - PNG Optimizer.
Ready is the tag
I hope you like this tutorial.
greetings Emmy
Thank you Nelly for testing.


tutorial written
16-12-2014

