1.
File - open new transparent image 700x700.
Activate mask -
edit - copy.
Edit - paste as a new layer on the image.
Image - resize 125% - all layers not checked.
2.
Activate the tube zand -
edit - copy.
Edit - paste as a new layer on the image.
Activate move tool - place it to the bottom.
3.
Activate the tube element55 -
edit - copy.
Edit - paste as a new layer on the image.
Place it up - see example.
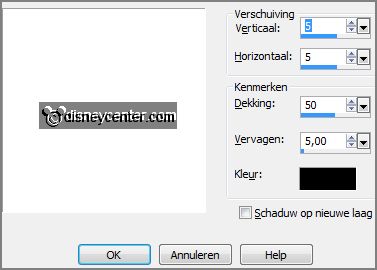
Effects - 3D Effects - drop shadow - with this setting.

4.
Activate selection tool- rectangle - and make a selection - as below.

Set the foreground color to #9a5129.
Layers - new raster layer.
Fill the selection with the foreground color.
Effects - Texture effects - baksteen 2 - with this setting.

Layers - arrange - down.
Selections - select none.
Activate the top layer.
5.
Activate selection tool- rectangle - and make a selection - as below.

Layers - new raster layer.
Set the background color to #c3b294.
Fill the selection with the background color.
Layers - arrange - down.
Selections - select none.
Effects - Texture effects - beton - with this setting.

6.
Activate the tube element43 -
edit - copy.
Edit - paste as a new layer on the image.
Activate selection tool- rectangle - and make a selection - as below - click at
the delete key.

Selections - select none.
Layers - duplicate.
Layers - arrange - up.
Effects - 3D Effects - drop shadow - setting is right.
Activate the eraser and erase the part on the window - also in the middle.
7.
Activate the tube gras -
edit - copy.
Edit - paste as a new layer on the image.
Place it left at the bottom.
Effects - 3D Effects - drop shadow - setting is right.
Layers - arrange - down and 1 more time.
Activate the top layer.
8.
Activate the tube cactus -
edit - copy.
Edit - paste as a new layer on the image.
Place it left at the bottom.
Effects - 3D Effects - drop shadow - setting is right.
9.
Activate the tube element54 -
edit - copy.
Edit - paste as a new layer on the image.
Place it left at the bottom.
Effects - 3D Effects - drop shadow - setting is right.
Layers - arrange - down.
10.
Activate the tube stone -
edit - copy.
Edit - paste as a new layer on the image.
Place it left at the bottom.
Effects - 3D Effects - drop shadow - setting is right.
11.
Activate the tube element57 -
edit - copy.
Edit - paste as a new layer on the image.
Place it in the middle at the bottom.
Effects - 3D Effects - drop shadow - setting is right.
12.
Activate the tube element49 -
edit - copy.
Edit - paste as a new layer on the image.
Place it in the middle at the bottom.
Effects - 3D Effects - drop shadow - setting is right.
13.
Activate the tube element59 -
edit - copy.
Edit - paste as a new layer on the image.
Place it right at the bottom.
14.
Activate the tube bag -
edit - copy.
Edit - paste as a new layer on the image.
Place it right at the bottom.
Effects - 3D Effects - drop shadow - setting is right.
15.
Activate the tube element60 -
edit - copy.
Edit - paste as a new layer on the image.
Place it right at the bottom.
Effects - 3D Effects - drop shadow - setting is right.
16.
Activate the tube element48-
edit - copy.
Edit - paste as a new layer on the image.
Place it right at the bottom.
Effects - 3D Effects - drop shadow - setting is right.
17.
Activate the tube element27-
edit - copy.
Edit - paste as a new layer on the image.
Place it right at the top.
Effects - 3D Effects - drop shadow - setting is right.
18.
Activate the tube element25-
edit - copy.
Edit - paste as a new layer on the image.
Place it in the middle at the bottom.
Effects - 3D Effects - drop shadow - setting is right.
19.
Activate the poser tube kids4-68 -
edit - copy.
Edit - paste as a new layer on the image.
Place it in the middle at the bottom.
Effects - 3D Effects - drop shadow - setting is right.
20.
Activate the wordart1 -
edit - copy.
Edit - paste as a new layer on the image.
Place it in the middle at the top.
Effects - 3D Effects - drop shadow - setting is right.
21.
Layers - new raster layer - set your watermark into the image.
Layers - merge - merge all visible layers.
File - export - PNG Optimizer.
Ready is the tag
I hope you like this tutorial.
greetings Emmy
Thank you Nelly for testing.