1.
File - open new transparent image
700x700.
Activate the tube 1 zestaw by Mago74 elem(69) -
edit - copy.
Edit - paste as a new layer on the image.
Adjust - blur - Gaussian blur - radius to 20.
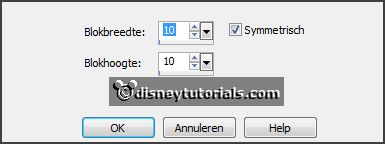
Effects - Distortion effects - Pixelate - with this setting.

Effects - Edge effects - enhance more .
Repeat Edge effects - enhance.
2.
Activate the tube 1 zestaw by Mago74 elem(119) -
edit - copy.
Edit - paste as a new layer on the image.
Layers - duplicate.
Image - mirror.
Image - flip.
Layers - merge - merge down.
Adjust - blur - Gaussian blur - setting is right.
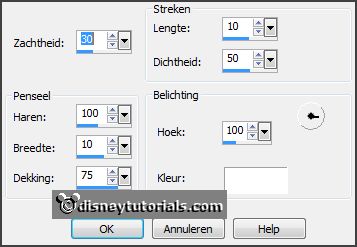
Effects - Art Media effects - strokes - with this setting.

Edit - paste as a new layer on the image (stays in memory).
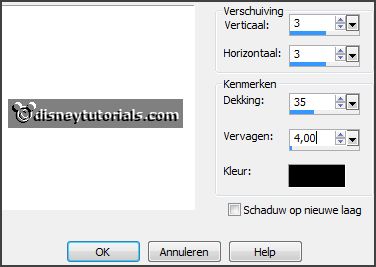
Effects - 3D Effects - drop shadow - with this setting.

3.
Activate the tube 1 zestaw by Mago74 elem(79) -
edit - copy.
Edit - paste as a new layer on the image.
Activate move tool - place it in the middle at the bottom.
Effects - 3D Effects - drop shadow - setting is right.
4.
Activate the tube 1 zestaw by Mago74 elem(80) -
edit - copy.
Edit - paste as a new layer on the image.
Place it in the middle at the bottom - on the frame - see example.
Effects - 3D Effects - drop shadow -
setting is right.
Activate raster 2.
5.
Activate the tube 1 zestaw by Mago74 elem(88) -
edit - copy.
Edit - paste as a new layer on the image.
Place it left - against the frame - see example.
Effects - 3D Effects - drop shadow -
setting is right.
Activate the tube 1 zestaw by Mago74 elem(68) -
edit - copy.
Edit - paste as a new layer on the image.
Image - free rotate - with this setting.

Place it left - between the 2 green plants - see example.
Effects - 3D Effects - drop shadow -
setting is right.
Layers - duplicate.
Image - resize 75% - all layers not checked.
Image - free rotate - setting is right.
Place it left and to the bottom - see example.
Activate the top layer.
6.
Activate the tube Green-Butterfly -
edit - copy.
Edit - paste as a new layer on the image.
Place it right - on the frame - see example.
Effects - 3D Effects - drop shadow -
setting is right
Layers - duplicate.
Image - mirror.
Place it left at the top.
Activate copy of raster 7.
7.
Activate the poser tube -
edit - copy.
Edit - paste as a new layer on the image.
Activate the eraser - and erase all what comes under the frame.
Layers - duplicate.
Layers - arrange - up.
Effects - 3D Effects - drop shadow -
setting is right.
Erase the peace of the leg, what on the frame is - near the flower.
Activate the top layer.
8.
Activate the tube 1 zestaw by Mago74 elem(5) -
edit - copy.
Edit - paste as a new layer on the image.
Place it right at the top - on the frame - see example.
Effects - 3D Effects - drop shadow -
setting is right.
9.
Activate the tube word-art-Butterflies -
edit - copy.
Edit - paste as a new layer on the image.
Place it right at the top - see example.
10.
Layers - new raster layer - set your watermark into the image.
Layers - merge - merge all visible layers.
File - export - PNG Optimizer.
Ready is the tag
I hope you like this tutorial.
greetings Emmy
Thank you Nelly for testing.