1.
File - open new transparent image
700x700.
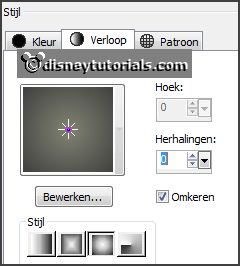
Set the foreground color to #404040 and the background color to #818372.
Make from the foreground a gradient sunburst - with this setting.
2.
Activate the tube background1 -
edit - copy.
Edit - paste as a new layer on the image.
I've erase right under something from the background.
3.
Activate the tube frame2_CD_GoneBad -
edit - copy.
Edit - paste as a new layer on the image.
Activate move tool - place it to the left - see example.
Layers - duplicate.
Image - resize 75% - all layers not checked.
Place it right of the frame -
see example.
Layers - duplicate.
Image - resize 75% - all layers not checked.
Place it right of the frame -
see example.
4.
Activate raster 2 - select with the magic wand in the middle of the frame.
Selections - modify - expand 10 pixels.
Layers - new raster layers.
Fill the selection with the gradient.
Layers - arrange - down.
5.
Activate copy of raster 2 - select with the magic wand in the middle
of the frame.
Selections - modify - expand 7 pixels.
Layers - new raster layers.
Fill the selection with the gradient.
Layers - arrange - down..
6.
Activate copy2 of raster 2 - select with the magic wand in the
middle of the frame.
Selections - modify - expand 5 pixels.
Layers - new raster layers.
Fill the selection with the gradient.
Layers - arrange - down.
Lock the bottom layer.
7.
Activate one of the other layers.
Layers - merge - merge all visible layers.
Open the bottom layer.
Activate the top layer.
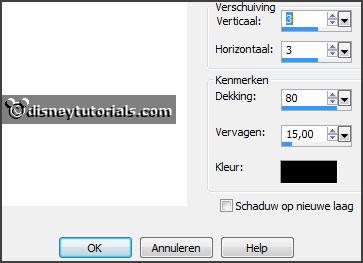
Effects - 3D Effects - drop shadow - with this setting.
8.
Activate the tube web -
edit - copy.
Edit - paste as a new layer on the image.
Place it left at the top of the big frame.
Erase the part of the web in the other frames.
9.
Activate the poser tube -
edit - copy.
Edit - paste as a new layer on the image.
Place it left at the bottom of the big frame.
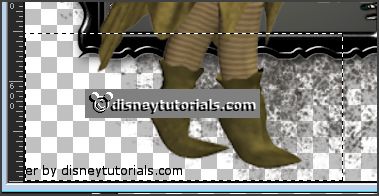
Activate selections tool - rectangle - and make a selection - as below - click
at the delete key.
Selections - select none.
Effects - 3D Effects - drop shadow - setting is right.
10.
Activate the tube sl_15 -
edit - copy.
Edit - paste as a new layer on the image.
Place it right at the top of the big frame.
Effects - 3D Effects - drop shadow - setting is right.
11.
Activate the tube SD FN TREE 2 -
edit - copy.
Edit - paste as a new layer on the image.
Place it right at the top of the smallest frame.
Effects - 3D Effects - drop shadow - setting is right.
Layers - arrange - down - set this under the merged layer.
Activate the top layer.
12.
Activate the tube HighFour_Boo_element30 -
edit - copy.
Edit - paste as a new layer on the image.
Place it left at the bottom in the middle frame.
Effects - 3D Effects - drop shadow - setting is right.
13.
Activate the tube element108_ks -
edit - copy.
Edit - paste as a new layer on the image.
Place it left at the bottom-
see example.
Effects - 3D Effects - drop shadow - setting is right.
14.
Activate the tube DigiMania-Spook Takular Skulls -
edit - copy.
Edit - paste as a new layer on the image.
Place it left at the bottom-
see example.
Effects - 3D Effects - drop shadow - setting is right.
15.
Activate the tube AD_HalloweenMagic (17) -
edit - copy.
Edit - paste as a new layer on the image.
Place it left at the bottom -
see example.
Effects - 3D Effects - drop shadow - setting is right.
16.
Activate the tube ASB_Hallowicious_element31
edit - copy.
Edit - paste as a new layer on the image.
Place it in the middle of the smallest frame -
see example.
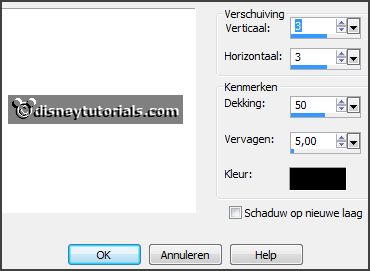
Effects - 3D Effects - drop shadow - with this setting.
17.
Activate the tube DigiMania-Spook Takular -Spider chain -
edit - copy.
Edit - paste as a new layer on the image.
Place it in the middle of the middle frame -
see example.
Effects - 3D Effects - drop shadow - setting is right.
18.
Activate the tube DigiMania-Spook Takular -WordArt -
edit - copy.
Edit - paste as a new layer on the image.
Place it right at the bottom -
see example.
Effects - 3D Effects - drop shadow - setting is right.
19.
Layers - new raster layer - set your watermark into the image.
Layers - merge - merge all visible layers.
File - export - PNG Optimizer.
Ready is the tag
I hope you like this tutorial.
greetings Emmy
Thank you Nelly for testing.


tutorial written 24-08-2015