1.
File - open new transparent image
700x700.
Set the foreground color to #3b2e19.
2.
Activate the tube Background -
edit - copy.
Edit - paste as a new layer on the image.
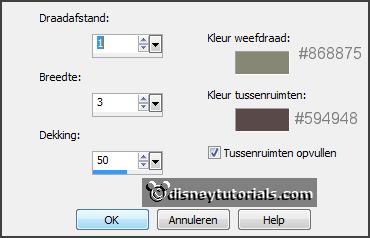
Effects - Texture effects - Weave - with this setting.

3.
Activate the tube RR_HauntedDreams_element058 -
edit - copy.
Edit - paste as a new layer on the image.
Activate move tool - place it a little to the bottom.
Select with the magic wand in the middle of the frame.
Selections - modify - expand 5 pixels.
Layers - new raster layer.
Fill the selection with the foreground color.
Layers - arrange - down.
4.
Activate the tube beware-halloween-haunted house -
edit - copy.
Edit - paste as a new layer on the image.
Selections - invert - click at the delete key.
Selections - select none.
Layers - merge - merge down.
Layers - arrange - down.
Activate the top layer.
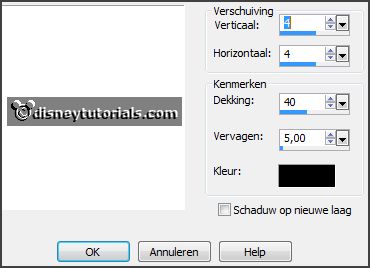
Effects - 3D Effects - drop shadow - with this setting.

5.
Activate the tube RR_HauntedDreams_element020 -
edit - copy.
Edit - paste as a new layer on the image.
Place it at the left side - see example.
Effects - 3D Effects - drop shadow - setting is right.
6.
Activate the poser tube -
edit - copy.
Edit - paste as a new layer on the image.
Place it at the ride side - see example.
Effects - 3D Effects - drop shadow - setting is right.
7.
Activate the tube RR_HauntedDreams_element016 -
edit - copy.
Edit - paste as a new layer on the image.
Place it leftt at the bottom - see example.
Effects - 3D Effects - drop shadow - setting is right.
8.
Activate the tube RR_HauntedDreams_element015 -
edit - copy.
Edit - paste as a new layer on the image.
Place it in the middle at the bottom - see example.
Effects - 3D Effects - drop shadow - setting is right.
9.
Activate the tube RR_HauntedDreams_element019 -
edit - copy.
Edit - paste as a new layer on the image.
Place it in the middle at the bottom - see example.
Effects - 3D Effects - drop shadow - setting is right.
10.
Activate the tube RR_HauntedDreams_element017 -
edit - copy.
Edit - paste as a new layer on the image.
Place it right at the bottom - see example.
Effects - 3D Effects - drop shadow - setting is right.
Layers - arrange - down.
Activate the top layer.
11.
Layers - new raster layer - set your watermark into the image.
Layers - merge - merge all visible layers.
File - export - PNG Optimizer.
Ready is the tag
I hope you like this tutorial.
greetings Emmy
Thank you Nelly for testing.


tutorial written 24-08-2015