1.
Set in the material palette the foreground color at #fe5126 and the
background color at #fedeb2.
Open the image mmroyal - shift+D - 2 times and close the original image. (If you
take another picture use a square picture).
Set 1 image at side.
2.
Image - add border 7 pixels - symmetric - foreground color.
Image - add border 10 pixels - symmetric -
background color.
Image - add border 7 pixels - symmetric -
foreground color
3.
Promote Background Layer.
Selections - select all.
Selections - modify - contract 24 pixels.
Click at the delete key.
Selections - select none.
4.
Edit - copy.
Edit - paste as a new image.
Go further with the original.
5.
Image - resize 72% - all layers not checked.
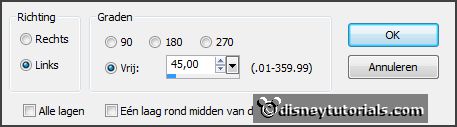
Image - free rotate - with this setting.
Activate the magic wand - with setting below - select
in the middle.

Selections - modify - expand 4 pixels.
6.
Activate the image what is aside - edit - copy.
Edit - paste as a new layer on the image.
Selections - invert - click at the delete key.
Layers - arrange - move down.
7.
Activate raster 1.
Let selection stay.
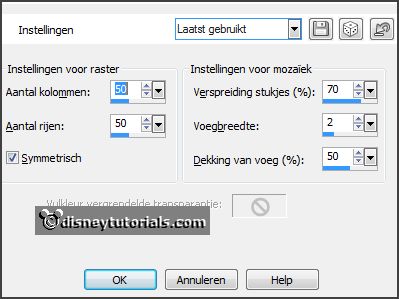
Effects - Texture effects - Mosaic-antique -
with this setting.
Selections - select none.
Effects - Edge effects - enhance.
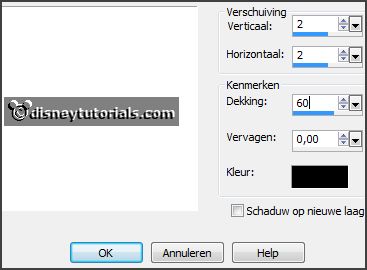
Effects - 3D Effects - drop shadow - with this
setting.
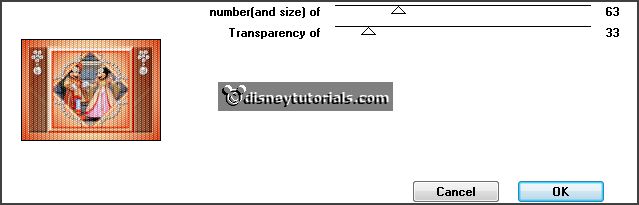
8.
Layers- new raster layer.
Make from the foreground a gradient sunburst -
with this setting.
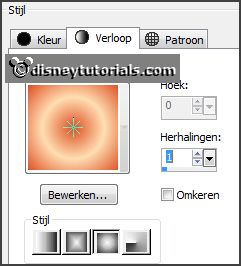
Activate flood fill tool - fill the layers with the gradient.
Adjust - blur - Gaussian blur - radius 35.
Layers - arrange - send to the bottom.
9.
Activate raster 1
Activate the tube pearlline - edit - copy.
Edit - paste as a new layer on the image.
Image - free rotate - setting is right.
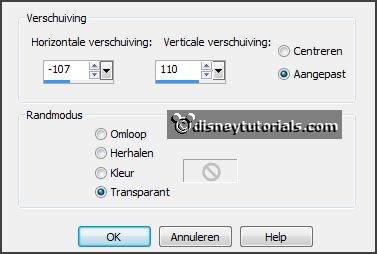
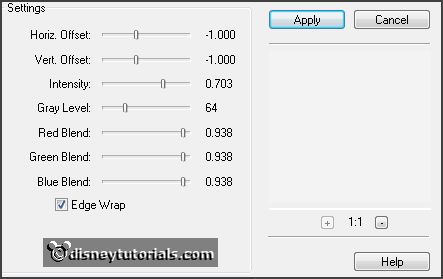
Effects - Image effects - offset - with this
setting.
Effects - plug-ins - Simple - Top Left Mirror - click OK.
Effects - 3D Effects - drop shadow - setting is right.
10.
Activate the image border - edit - copy.
Edit - paste as a new layer on the image.
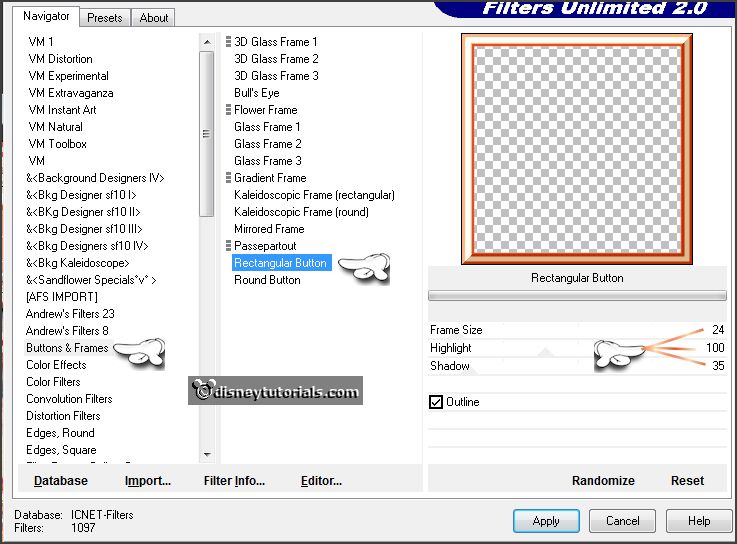
Effects - plug-ins -I.C.NET Software - Filter Unlimited 2.0 - Buttons &
Frames - Rectangular Button - with this
setting - click Apply.
11.
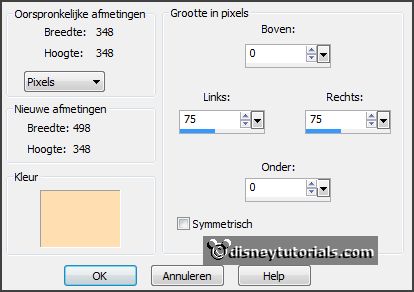
Image - add borders - not symmetric - with
this setting.
Select with the magic wand the width borders.
Fill the selection with the gradient - stays right.
Promote selection to layer.
Selections - select none.
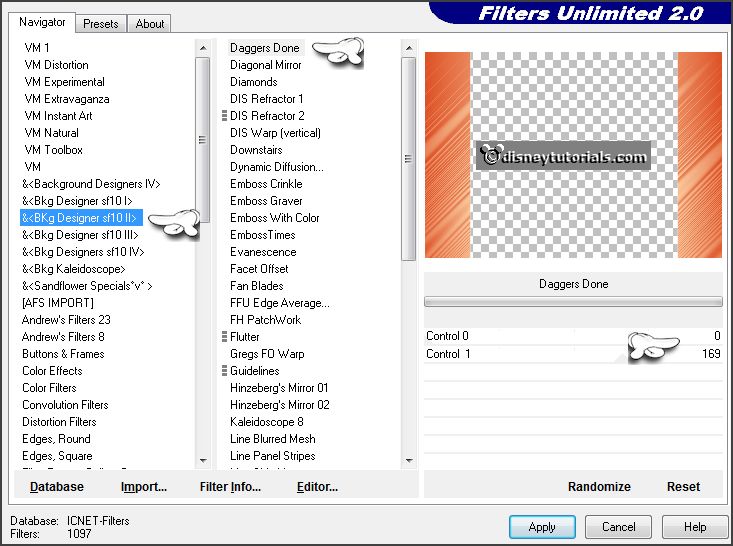
Effects - plug-ins - I.C.NET Software -
Filter Unlimited 2.0 - &Bkg Designer sf 10 II - Daggers Done -
with this setting - click Apply.
12.
Layers - duplicate.
Image - mirror.
Set the opacity of the layer to 50.
Layers - merge - merge down.
Effects - plug-ins - FM Tile Tools -
Blend Emboss - with this setting -
click OK.
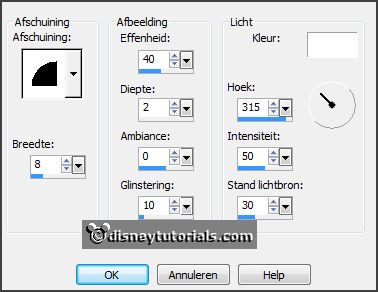
Effects - 3D Effects - Inner Bevel - with this
setting.
13.
Activate the tube pearlline1 - edit - copy.
Edit - paste as a new layer on the image.
Activate move tool - pit this left at the top.
Layers - duplicate.
Image- mirror.
Layers - merge - merge down.
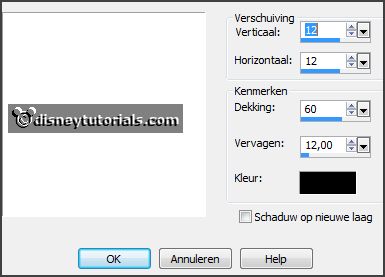
Effects - 3D Effects - drop shadow - with this
setting.
14.
Image - add border 2 pixels - symmetric -
background color.
Image - add border 25 pixels - symmetric -
foreground color.
Select with the magic wand the width rand.
Fill the selection with the gradient.
Effects - plug-ins - CPK Designs -
Glass - with this setting - click OK.
Effects - plug-ins - FM Tile Tools - Blend Emboss -
setting is right - click OK.
15.
Selections - select all.
Selections - modify - contract 25 pixels.
Promote selection to layer.
Selections - select none.
Effects - plug-ins - Alien Skin Candy 5 Impact - Perspective Shadow -
click at Settings - User Setting - click Emmyroyal - click OK.
16.
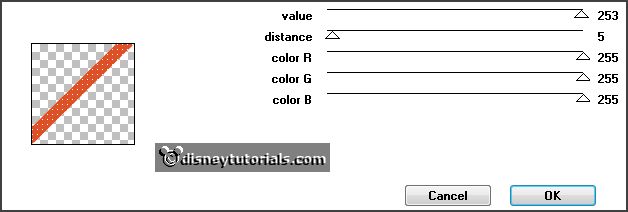
Layers - new raster layer.
Selections - load/save selection - load selection from disk - lookEmmyroyal -
with this setting.
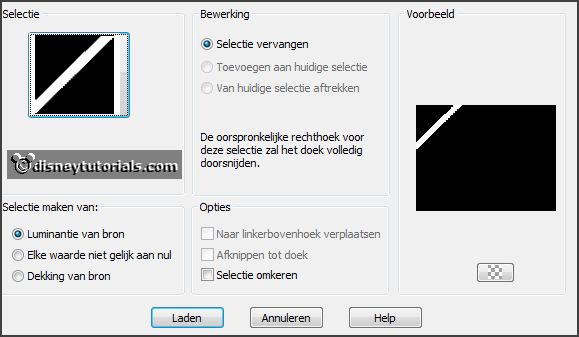
Set the foreground back to color.
Fill the selection with the foreground color.
Effects - plug-ins - Penta.com - Color
Dot - with this setting - click OK.
Selections - select none.
17.
Effects - 3D Effects - Inner Bevel - setting is right.
Layers - arrange - move down.
Effects - plug-ins - Simple - Top Left Mirror - click OK.
Layers - duplicate.
Image - resize 125% - all layers not checked.
18.
Image - add border 2 pixels - symmetric -
foreground color.
Image - add border 5 pixels - symmetric -
background color.
Image - add border 5pixels - symmetric -
foreground color.
Image - add border 5 pixels - symmetric -
background color.
19.
Layers - new raster layer - put your watermark into the image.
Layers - merge - merge all layers.
File - export - JPEG Optimizer.